Tuesday, March 26, 2013

Curry Dal

I made this dal the other week after being to Braise for a sausage making course.  We had it under a pan fried country sausage and it was just delicious. I see they found the recipe from http://www.monicabhide.com  and so I largely kept in unchanged however I added some fenugreek seeds and curry leaves to boost the flavor a little.  I used brown lentils as I couldn't find moong dal, the original recipe calls for the split yellow mung bean moong dal, and so if I find them I will try it with those another time.  I don't think it impacts the flavor too much, probably just a slightly longer cooking time with brown lentils.

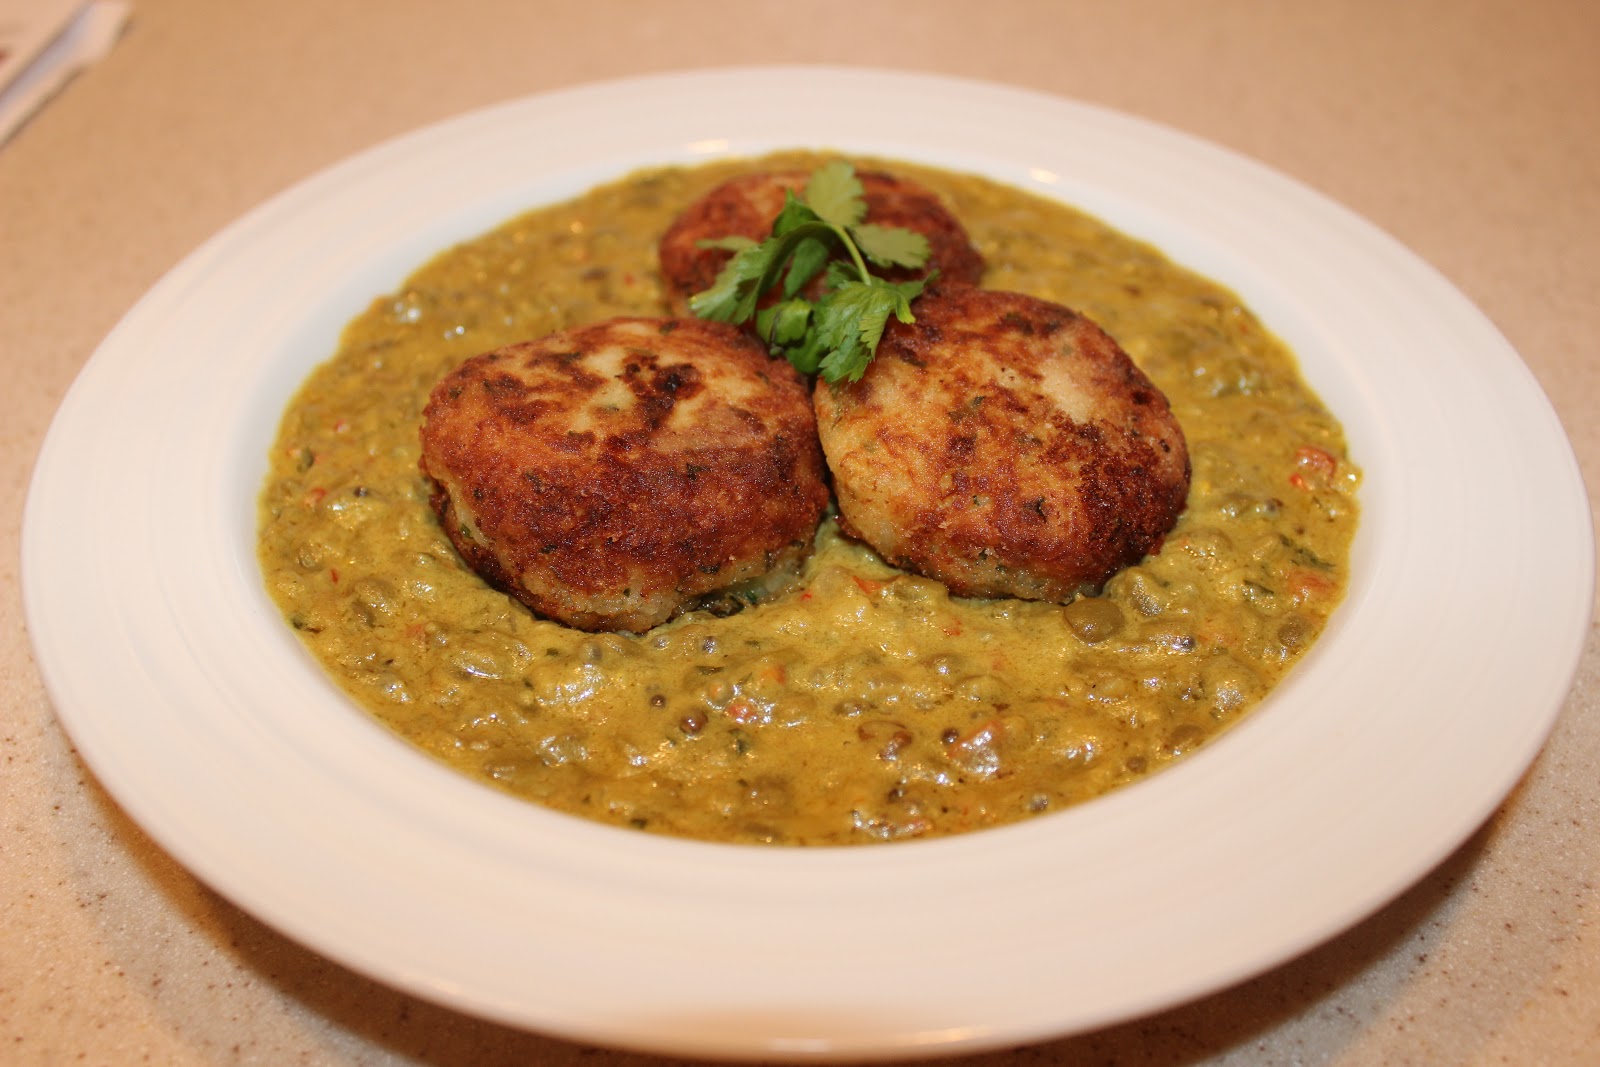
I served it with my fish cakes http://whatsfordinner-mum.blogspot.com/2013/02/fish-cakes.html and the flavors complimented each other beautifully.  


Makes 4 serves

1 cup green/brown lentils (Or split yellow mung bean, moong dal)
4 cups water
1 tspn turmeric
4 tblspn vegetable oil
1 cup coconut milk

Tadka
1 tspn cumin seeds
1/2 tspn mustard seeds
1/2 tspn fenugreek seeds
1 small red onion, minced
1 or 2 whole dried red chili's, crushed
4 or 5 curry leaves
1 tspn grated ginger
2 cloves garlic, minced
1 or 2 small tomato, finely chopped (optional)
salt to taste
1 tblspn minced fresh cilantro

Method:
  • Rinse dal or lentils under running water in a fine mesh sieve and remove any debris which doesn't belong.  
  • Drain thoroughly.  
  • In a deep saucepan, bring water, turmeric and 1 tblspn of oil to a boil over high heat
  • Add lentils/dal. Reduce heat to medium-low and simmer, uncover for 30mins, stirring occasionally until dal is soft.  If the water starts to evaporate, add another 1/2 cup water.  
  • Remove from heat and set aside.
  • In a medium skillet, heat the remaining 3 tblspn of oil over medium-high heat.  
  • Add cumin seeds, mustard and fenugreek seeds and when they begin to sizzle and pop, add onion.  
  • Saute for a few minutes until onions are browned.  
  • Add ginger, garlic, chilies and tomato.  Cook for a couple of minutes and then add coconut milk.
  • Cook stirring occasionally for another 8 minutes, add cilantro and salt to taste and mix well.
Add tadka to dal and mix well until thickened.

Tuesday, March 19, 2013

Chocolate Cupcakes

Another successful recipe I use from Glory, at www.glorioustreats.com which was adapted from an original Hersey's chocolate cupcake recipe.  It is put together in such an unusual sequence that I would have never thought the runny, liquid consistency would ever turn into these perfectly chocolate, cupcakes. They have never failed and are so moist, they are irresistible.


Happy St Pat's Day!

Makes 26-30 standard sized cupcakes

Ingredients:
2 cups sugar
1 3/4 cups all purpose flour
3/4 cup unsweetened cocoa (best quality available - so I don't use hershey's!)
1 1/2 tspn baking powder
1 1/2 tspn baking soda
1 tspn salt
2 eggs
1 cup whole milk
1/2 vegetable oil
2 tspn vanilla extract 
1 cup boiling water

Directions:
  • Line muffin tin with cupcake liners.
  • Preheat oven to 350'F
  • In a large electric mixing bowl, stir together the sugar, flour, cocoa, baking powder , baking soda and salt.
  • Add eggs one at a time, followed by milk, oil and vanilla.  Beat on a medium speed for about a minute.
  • Stir in the boiling water.  This is where it just gets really strange - it is SO runny, you'll never think it will bind and bake, but it will!
  • Pour the batter into a smaller container with a spout and fill your liners 2/3 full.
  • Bake the cupcakes for approximately 18-22 mins, depending on your oven.

Be sure to cool cupcakes completely on a wire rack before frosting.


Wednesday, March 13, 2013

French Onion Soup

Ooh-la-la!  This soup is divine.  Sweet, beefy with an underlying complexity of flavors.  This was part of a three course dinner party we had some time ago.  Here is a Donna Hay recipe I used today from her Seasons recipe book, and it was delicious, make sure you use a good beef stock and season well.  

For our dinner party, we followed the soup with the herb crusted lamb (http://whatsfordinner-mum.blogspot.com/2012/04/herb-crusted-lamb-rack.html) and then Creme Brûlée (http://whatsfordinner-mum.blogspot.com/2012/05/creme-brulee.html) as dessert.  We were nicely full but it wasn't over the top.  

I served the French Onion soup with a gruyere crouton as well as toasted croutons and extra cheese on the side.  The boys at the table really enjoyed throwing in some extra and it was a nice way to ensure the croutons stayed crunchy while I served up the dinner. 


Lunch today

Dinner party


Serves approx 6 people

Ingredients:
30g (2 1/2 tblspn) butter
3 tblspn olive oil 
1 kg (2 lbs) brown onions, sliced
1 tspn chopped fresh thyme leaves
2 cups water
4 cups beef stock
1/2 cup white wine
sea salt and cracked pepper

Method:
  • Finely slice the onions, I did mine in the food processor as I doubled the recipe and wasn't prepared to cry for that long
  • Heat a large soup pot and melt the butter and oil
  • Add the onions and thyme and allow to soften and caramelize,  this takes up to 15-20mins.  Stir them regularly but not constantly
  • When the onions are nicely brown add the wine and let it burn off, 30 seconds
  • Add the beef stock and water and allow to simmer for about 30mins
  • Taste and season with salt and pepper.
  • Prepare your croutons or bread.  Using a good french loaf, brush a little oil over a slice of bread and grill on both sides.  Either slice the bread into large cubes and eat as croutons or cut in half and add gruyere or fontina cheese and place under the broiler until the cheese has melted and sit it in the soup. 

Thursday, March 7, 2013

Beef Rendang

Another Rasa Malaysian recipe which turned out just beautifully, I didn't change a thing so check out her original directions here if you like http://rasamalaysia.com/beef-rendang-recipe-rendang-daging/2/

This is a Malaysia dish.  I remember my Dad eating it when we went to Penang about 22 years ago... he ate it for breakfast, lunch and dinner for almost the entire 10 days. Not surprisingly on the flight home he had stomach pains and an increased heart rate - so much curry for one not accustomed to eating it so regularly really put his system to the test!  This was almost sweet it had so many delicious spices in it. Each and every one made a difference. I actually started cooking this without the star anise and lemongrass but added it in as it cooked in the slow cooker. The lemongrass made a massive difference, so please do your best not to leave a single one out - you can taste the impact they all have. 

I had the leftovers in a wrap with some non fat yoghurt and cilantro for lunch today... even better than last night!


Serve 4-6 as part of a bigger feast or 2-3 if you eat it as a main meal.

Ingredients:
2lb boneless chuck beef or boneless spare ribs (cut into cubes)
5 tblspn cooking oil
1 cinnamon stick
3 cloves
3 star anise
3 cardamon pods
1 lemongrass (cut in 4 x 1 inch lengths and pounded or processed in a mini processor)
1 cup thick coconut milk
1 cup water
2 tspn tamarind pulp or concentrate
6 kaffir lime leaves
6 tblspn kerisik (toasted coconut)
1 tblspn brown (or palm) sugar
salt to taste

Spice paste
5 shallots / spring onions
1 inch galangal
3 lemongrass (white part only)
5 cloves
1 inch ginger
8-10 dried chilies (soaked in warm water)
1 fresh red chili, deseeded and finely chopped

Method:
  • Place the spice paste ingredients into a mini processor and chop until fine.  I added a drop of the oil to keep it loose and combine the paste
  • Heat the oil in a stew pot or large pan, add the spice paste, cinnamon, cloves, star anise and cardamom and fry them until fragrant about 2 or 3 minutes
  • Add the diced beef and toss through the spices.  Using a mortar and pestle, pound the lemongrass to break up the flavor and add to the beef.  Or if you prefer not to see the lemongrass at all, I would suggest popping it in a processor and chop it finely.
  • Pour in the coconut milk, tamarind, water and simmer stirring frequently until the meat cooks.
  • Add the kaffir lime leaves, toasted coconut and sugar.  Taste and adjust the seasoning with salt or  extra sugar.
  • Reduce the heat to low and allow to simmer with the lid on for 1 1/2 hours or if you prefer, transfer to a slow cooker and allow to cook on low for 3-4hrs until the meat is tender and the sauce has reduced almost to dry
  • Taste and adjust seasoning if required.
  • Serve immediately with steamed rice.

Kerisik is toasted unsweetened shredded coconut.  Simply heat a hot non stick pan, toss the coconut in it (do not add oil) until it starts to toast and turn golden brown.  It will only take a minute.


Wednesday, March 6, 2013

Perfect Vanilla Cupcakes

I have been following a woman on and off (in a culinary kind of way not a freaky stalking kind of way!). Her name is Glory and she maintains a gorgeous website posting unique sweet treats and party ideas, Glorious Treats.   Check her out at www.glorioustreats.com  she is amazing and does some beautiful stuff. When you stay up late searching pinterest like I do, you find some amazingly talented people and it often turns into a session of reading all about their background and their passions and searching through archived posts and tutorials.  So when I found her post entitled "The Perfect Vanilla Cupcake" I felt I needed to experience that.  I quite liked my original vanilla cupcake recipe  I used from taste.com.au which I had previously posted, as I had had pretty good success with it but once I tried these... there is definitely no going back.  Just look at them... they're perfect!  


Perfect Vanilla Cupcakes Recipe by Glorious Treats, photo by Mo.

There are a number of different things going on with these cupcakes which help to make them perfect.
1.  The use of cake flour not regular all purpose plain flour.  Cake flour has a lower gluten level so produces a finer, softer end product
2.  The use of oil rather than butter, allows for that light and airy feel like you get from using a packet mix (e-gad) 
3. The use of buttermilk.  It provides a slight tang to cakes and because of its acidity it helps activate the gluten in the flour and allows it rise quickly and lead to a softer cake.

Anyway I will leave it up to you to decide.  I have never before had a tray of cupcakes that turned out so evenly and beautiful.  I would serve these without frosting they looked so good!  But I didn't ....because I love cream cheese frosting too much is why!  So I turned them into this instead.  


It was my Dad's birthday (in Australia I might add) so I made him these.  Then Lucy, Georgia, Mark and I went ahead and ate them in all in celebration!  Happy Birthday Dad, we love you!

Makes 15-16 regular size cupcakes

Ingredients:
1 1/4 cups cake flour
1 1/4 teaspoons baking powder
1/2 teaspoon baking soda
1/2 teaspoon salt
2 eggs
3/4 cups sugar
1 1/2 teaspoons pure vanilla exract
1/2 cup oil (vegetable, canola or extra light olive oil)
1/2 cup buttermilk

Method:
  • Pre heat your oven to 350'F
  • Line your muffin trays with cupcake liners
  • In a medium bowl, whisk together your flour, salt, baking soda and powder
  • In the electric mixer bowl, beat your eggs one at a time on medium for 20seconds then add your sugar.  Continue to beat until combined, about 30 seconds.  
  • Add you oil and your vanilla extract and continue to beat
  • Slow your mixer down to low and gradually add about half your flour mixture.  Then add half of the buttermilk and continue to beat.  Follow with the remaining flour then milk.
  • Beat until combined, another minute perhaps and scrap down the sides to ensure it is all combined.
  • The batter is going to be thin, that is correct.
  • Pour the batter into the prepared muffin pan filling them to about 2/3 full.
  • I placed my trays towards the bottom third of my oven to ensure they didn't rise too quickly and overflow.
  • Cook for approx 12 - 14 minutes, until just golden brown on top.  Pierce them with a skewer if you need to test them.  It should come out clean. 
  • Allow to rest in the tray about 5minutes before removing them to a cake rack to cool completely.
  • Frost when totally cooled.

For Glory's Vanilla Cream Cheese Frosting check out her link http://www.glorioustreats.com/2010/02/recipe-cream-cheese-frosting.html

Crispy Honey Lemon Chicken

I stumbled across a great website containing loads of delicious Asian recipes, called Rasamalaysia and they have some of our favorite Asian dishes, made pretty simply.  I used a mixture of their orange chicken and the honey chicken to come up with this one.  I have never really tried my hand at the deep fried Chinese chicken dishes before but I thought it might be a good way to get the girls to try different sauces.  Let's just say we've had a big fry up this week... the girls LOVED it.  I suppose it was no surprise given it's flash fried chicken in a sweet honey and lemon sauce.  Mark and I really enjoyed it too, knowing the sauce wasn't full of MSG and the chicken was fresh and hormone free.

I made this twice this week, the first time in an orange and garlic sauce but we all liked this one better.  I may need to perfect the sauce I think and update it again as I ended up adding sugar to it last night because I didn't like the honey I used. I think if you choose a nice, not over powering honey, you should be right with these proportions.   The biggest winning aspect of this dish was the frying batter, so if you get that right you'll have them eating out of your hands!


Serves family of 4

Ingredients:
2 boneless chicken breast, cut into bite size cubes
season lightly with salt and white pepper

1/4 cup cooking oil for frying, vegetable or canola oil

Frying batter:
1 oz cornstarch
2oz all purpose flour
1/4 tspn salt
1/2 tspn baking soda
1/2 cup ice cold water
1/2 egg
1 tblspn cooking oil

Honey lemon sauce:
1/3 cup honey
2 tblspn lemon juice
1 tspn rice wine
1 tspn rice vinegar or apple cider vinegar
1 tblspn soy sauce
3 tbslpn chicken broth
1 tspn cornstarch
1 tblspn vegetable oil
sugar (if needed)

Method:

  • Whisk all the honey lemon sauce ingredients together and leave aside.
  • Make the frying batter in a large bowl and drop you seasoned chicken pieces in. 
  • Prepare and start cooking your rice in a saucepan on the stove.
  • Heat up the cooking oil in a large saucepan or wok
  • Drop the chicken pieces into the oil gently and allowing enough space between pieces so they fry well and don't stick together.  Do them in small batches if necessary.  Cook on each side until golden brown about 4-5mins total I would say. Drain on paper towel and set aside. (I warmed my oven up to 300'F so I could transfer the cooked chicken to a baking tray to keep warm, only because I was waiting for my husband to come from work and wasn't sure of timing)
  • In a small saucepan, heat the honey sauce and whisk gently until it begins to thicken. 
  • When ready to eat, serve the chicken with a sprinkle of sesame seeds over steamed jasmine rice.
  • I kept the sauce separate and poured it over the chicken and rice once it was dished up, to ensure the chicken stayed crunchy.  Many recipes call for stirring the chicken through the sauce in a large wok but I tried that and the crunchy batter turns soft and mushy... not what I was after.


Sunday, March 3, 2013

Peruvian Baked Chicken Thighs

This is a Sara Moulton recipe a friend of mine did the other week and it was so delicious.  I have a thing for chicken thighs at the moment so I was so excited by this one.  I think my friend Eric may have gone heavier on the cayenne pepper, which I really liked. When I made it again for the blog I added some spring onion and lime juice to the marinade in place of some of the vinegar and it was awesome too but probably only just as delicious as my first tasting without it, so I am posting the original recipe here for you to adapt yourselves.  I think a little bit of lime juice goes nicely with strong spices like this but it's all a personal preference.

Now, before you ask did I give this to my kids?  No I didn't, but while I am baking chicken thighs, there is no reason they can't eat them with a milder spice on them.  I put two chicken thighs aside in a ziploc bag with some "moroccan" spice and a glug of good olive oil.  While ours were marinating in these gorgeous flavors theirs were doing their own thing in Morocco.  My eldest daughter Lucy said, after devouring her chicken in minutes accompanied by a lot of oohs and aaahs... "I don't care what you cook us tomorrow night for dinner Mum but it HAS to have this chicken with it!".  Finally, she appreciates that I feed her well!

This sort of dish is excellent if you have a busy evening ahead.  Get the marinade done when you have the time and leave to marinade during the day.  When you are about to head out, get them in the oven ready and set your timer.  I had these 5mins off cooked when I walked in the door, I made some cous cous and zapped some carrots and corn in the microwave and we were eating within 10mins.  


Ingredients:

6 chicken thighs, bone in skin on
3/4 cup fresh cilantro
1/2 cup soy sauce
3 tblspn white vinegar
1 tblspn ground cumin
1 1 /2 tspn paprika
3/4 tspn dried oregano
1/4 tspn cayenne pepper
6 cloves garlic, crushed

Green sauce
3 large scallions
1/4 cup serrano chili
1 tblspn fresh lemon juice
1/2 cup crumbled goat cheese
1 tblspn vegetable oil
1/2 tspn salt
1/4 tspn black pepper
1/2 cup half-and-half (I would use non fat yoghurt)

I actually paired this with my cucumber and yoghurt dressing and just added a fresh chili to it as well. http://whatsfordinner-mum.blogspot.com/2013/01/harissa-chicken-skewers-with-cucumber.html

Method:
  • Combine all the ingredients for marinade in mini processor and blend together.  
  • Add the chicken and the marinade together in a large ziploc bag and allow to marinade for at least 30min, longer if you can.
  • Preheat oven to 450'F when ready to bake and cook on a shallow baking dish for 20-25mins or until crispy on top and cooked through.
  • Allow to rest for 5mins before serving with your chosen sides and yoghurt dressing.


Saturday, March 2, 2013

Homemade pizza

I think we've all bought the pizza dough from Sendiks and called it 'homemade' pizza before, and it's close enough when we lead busy lives but I tell you, it has NOTHING on this.  Spend a few minutes and make the dough yourself... just once, and you'll be so pleased you did. Maybe you wont do it every time but believe me, you'll enjoy the honest work of kneading and manipulating the dough and it really doesn't take as long as you probably imagine. It is about a 12min 'active' process and then you set and forget for about an hour.  It is a wonderful thing to do with kids as they will be so interested in how all the ingredients work together to make it 'grow'! My youngest daughter continued to say she doesn't like pizza and in America as you can imagine, that can be a problem sometimes.  We made this together and she chose her toppings (hence the simple bacon and cheese below - the arugula was merely for photographic blog effect!)... and she loved it!  They can get their hands dirty, better than playing with playdoh and then watch as the dough rises and grows.  It's pretty impressive.  A great weekend activity and with some yummy homemade tomato and basil pizza sauce, (that might be another day!) it will be divine!  Good enough to share with friends x


Makes 2-3 large family pizza's (or 4 plate sized)

Ingredients:
800g Strong bread flour
200g Semolina flour
30g active yeast or 3 x 7g dried yeast sachets
30g honey or sugar
30g salt
625ml tepid water

Method:
  • Dissolve the yeast and sugar in half the tepid water and allow to activate (maybe 5mins)
  • In a large bowl, mix the flour and salt.  Make a well in the middle and pour in all of the dissolved yeast mixture.
  • Using your fingers, twist in a circular motion from the centre gradually incorporating flour until all the yeast is stirred in.
  • The pour in the other half of the water and keep mixing until all the flour is combined and you have a rough moist dough.
  • Turn the dough onto a clean lightly floured surface and begin to knead!
  • Roll, push, fold and knead until the dough comes together as an elastic and smooth dough.  You should knead it for about 5mins to allow the gluten to develop.  Use more flour on your hands as you go when needed.
  • Now make the dough into a rough round shape and place it on a lightly floured baking tray.  Lightly flour the surface of the dough as well and then score the top deeply with a knife so the dough can easily prove and rise.
  • Place it in a dark, warm place until it has doubled in size. Depending on how warm it is, it should take about 45mins.  
  • When the dough has risen, you can now divide your dough and roll it into your pizza bases.
  • Add your pizza sauce and preferred toppings and when ready, pre-heat your oven to a good 450'F - 475'F (+240'C) and place your pizza on a pizza stone or directly on the racks and cook until the toppings have melted and the base is golden brown, about 10-12mins should be good.

Friday, March 1, 2013

Chicken Cacciatore

Cacciatore... means "hunter" in Italian and so is usually made with chicken or rabbit, depending on the region and either red wine, down south or more often white wine in the north.  It is a beautiful simmer of chicken in tomatoes, onions, mushrooms and peppers, herbs and wine.  Like anything that needs to stew, it is nicer to pan sear the meat first to enhance the flavor and brown the skin before adding it back in to simmer away.

I had to hold myself back from adding too many herbs and other spices to this dish but I felt this was pretty authentic and had a lovely gentle flavor in the end, perfect for the entire family to enjoy. Any recipe I searched for had almost these same ingredients give or take a few but the Pioneer Woman makes an interesting one using turmeric, I might give that a try next time. Essentially this was a food network inspired meal from Giada de-Laurentis although I used different herbs and spices. This made miles too much for our family with two small children as we all only ate one thigh each but I figure 6 pieces would suit most families of four.  


Serves family 4-6

Ingredients:
6 chicken thighs, bone in skin on
salt and pepper
1/2 cup all purpose flour
1/2 stick butter
1 onion, sliced
1 red pepper (or 1/2 red + 1/2 green)
1 cup mushrooms, roughly sliced
3 cloves garlic, crushed
2 x 14oz tins of tomatoes
3/4 cup chicken broth
3/4 cup white wine
2 tspn capers, chopped
handful of fresh thyme and oregano (or dried)
shake of paprika
oops.. and wine, that was already in my fridge of course!
serve over pasta and a sprinkle of parmesan cheese and fresh parsley

Method:
  • Heavily salt and pepper the chicken pieces
  • Dredge in flour and dust off, a light cover is enough
  • Heat the butter in a large pan with a lid and sear the chicken, both sides until browned.  About 4 mins each side, then remove and put aside.
  • Drain the fat from the pan and then sauté the onions, mushrooms and peppers. Season with additional salt and pepper
  • Add the garlic and continue to stir through until vegetables are softened.
  • Add the white wine and cook until reduced, by about half
  • Add tomatoes, chicken broth, chopped capers and herbs and spices and then add the chicken pieces back into the pan.
  • Cover with the lid and cook on a low-medium heat for up to 1hr or until the chicken thighs are cooked through.
  • When ready to serve, cook your pasta in salted boiling water.
  • Drain and serve up your pasta, scoop some vegetables over the pasta, (you can remove the chicken pieces for a few minutes and reduce the sauce on high heat until it thickens if necessary) arrange the chicken and pour a little more sauce over and sprinkle with parmesan cheese and fresh parsley for some lovely color.