Monday, October 29, 2012

Busy Day Chicken

This has been a favourite of ours for many years.  It's not flashy, or difficult but it is certainly the easiest thing in the world to do and has all the necessary ingredients for a wholesome and healthy every day meal.  I had all my vegetables cut up earlier in the day - already laid out in the baking dish, the potato and pumpkin I left soaking separately in cold water so they didn't go brown. I put the oven on when the girls got home from school, arranged the (raw) diced chicken, added the potatoes and pumpkin, spooned on the soup, mayonnaise and seasoning and away it went to cook.  We were eating in an hour and I had one dish to wash up.  I hadn't made it for the kids before but they enjoyed it, well - as much as they enjoy eating that many vegetables normally.  I serve it on a little rice and the soup bubbles away at the bottom of the baking dish to make a sauce which helps bring it all together.  It was delicious, hubby and I love it.  A great go-to recipe when you think there is nothing in the cupboard to eat or you want to finish up stray vegetables in your fridge.

Arrange all the chopped vegetables and chicken


Add the soup, mayo mixture and cheese and bake


Serves 4

1(440g) tin fat free cream of mushroom soup
2-3 cups mixed vegetables - cut in roughly the same sizes (1'inch cubes) broccoli, cauliflower, pumpkin, potato, zucchini, mushrooms, carrots
1 chicken breast, diced
salt and cracked pepper
1 tspn mild curry powder
2 tblspn mayonnaise
1/2 cup grated tasty or cheddar cheese
1/3 cup sprinkle of breadcrumbs
sml knobs of butter

As you can see, we ate it before I had time to photograph it -
it smelled SO good!!
Cook in a preheated oven at 375'F for about 1 hour or until the top is golden brown and vegetables are cooked through.

Sunday, October 28, 2012

Halloween Party Ideas

Five little pumpkins sitting on the gate, the first one said "Oh my it's getting late", the second one said "There are witches in the air", the thrid one said "but we don't care", the forth one said "lets run and run and run" the fifth one said "Isn't Halloween fun!!".... Well Halloween was certainly fun for my two little pumpkins this year!

School had a fabulous Halloween parade for all of Lower School followed by classroom parties all over the Pre-Primary area!  The girls were surrounded by Halloween fever from mid last week through to the weekend.  Here are some cute ideas to use at your next Halloween party.  Most of it comes to life with some thoughtful presentation but a few little treats can make all the difference.


I used a lot of short clear plastic cups which I drew on with black markers, different jack o lantern faces. I used these for both portion control as I was dealing with 5 yr olds (!) and as a cute way to fill the table.  I had orange cheetos in some and had sliced peaches with an orange fork my older daughters classroom as a healthy treat.


Larger plastic cups decorated with black and orange ribbon added some height to the table and I placed dried apricots and cracker mix in others.  A big bowl of candy corns added color as well and the kids thought all their halloweens had come at once!


Rice Krispie Jack-o-lanterns

makes approx 60 pumpkins


Ingredients:

11.5 cups rice bubbles/rice krispies
1 full stick of butter / 113 gm
1 tspn vanilla essence
16oz bag of mini marshmallows
red and yellow food coloring
mini tootsie rolls


Method:
  • In a large pan or wok, heat the butter until melted.  
  • Add the marshmallows and stir constantly until they melt completely.
  • Add the food coloring and vanilla
  • Now add the rice bubbles and stir until well combined
  • Take off the heat.
  • Using mini muffin trays, spoon a good teaspoon of mixture into the muffin tray and mold using the back of the spoon and your fingers, until you get a dense ball. 
  • Once in a ball shape, remove and place on a lined baking tray.  Continue until all the mixture is used up
  • Then using green icing or a gel cake decorating pen, scribble some green 'leaves' on the top of each pumpkin
  • Melt one end of a mini tootsie roll, using a hand stove ignitor (a 'clicker' I call them) and push onto the top of each pumpkin to form the 'stem'
  • Using black cake decorating pen or a bag of icing with black food colouring pipe on your jack o lantern faces.


Ghost cupcakes
Using my vanilla cupcake recipe already posted, http://www.blogger.com/blogger.g?blogID=3258279163478692852#editor/target=post;postID=4692017559725332244 make a batch or two of cupcakes, however add red and yellow food colouring to make them orange.  I made these about a week before I needed them and froze them in plastic cupcake trays wrapped in plastic, so I only had to decorate them the day before the party.


  • Using rolled white fondant, (found in most cake decorating stores or good supermarkets) roll out your fondant until it is about 2mm (1/8th inch) thick.  Use a circular cookie cutter and cut out as many circles as you have cupcakes.  Roll each circle then into a slight oval shape. 
  • Use your index finger to help mold the ghost shape or hang it over a small rounded top bottle if that is easier so you can create the ghost folds.  Allow them to sit on a baking tray until fully dry and hard, about 3-4 hours.  Don't over work them, they're ghosts - they don't have to be perfect.
  • Using the same black icing as above or decorating pen, pipe on your little ghost eyes.


Make your preferred frosting or icing, or use a store bought vanilla frosting and pipe on each cupcake enough to cover the top.  When you're ready, sit your ghost on top and display on a tiered cake stand for the best effect.


Butternut squash and ricotta ravioli

Homemade pasta... it can be daunting to think about but once you start, you wish you did it every time. I am by no means a good pasta maker but I love the taste, the texture and the sense of satisfaction I get from making it.  You can't compare it to store bought or packet pasta - fresh pasta is incredible and worth every minute.  It's harvest time here so I thought we should make something festive and full of Fall.  Over the weekend I had my youngest daughter helping me, and together we had a really fun time.  I didn't worry about presentation or quality control for this exercise and the result was, a beautiful pasta made with a lot of love and care and something the whole family enjoyed sitting down to. Georgia was so keen to do every part of the pasta process, it was fabulous to see. As all the books and cooking shows tell you, the more you get your kids involved in the process the more likely they are to eat it.  Well, I have to say G had an empty bowl that night and I know she's not a big pumpkin fan.  I was well impressed.   My little sous chef. 


For the filling:                                                        For the Pasta:
1/2 butternut squash, roasted                         400g Strong Flour  (or 600g/1lb total flour )
extra virgin olive oil                                      200g Semolina Flour
3 cloves garlic, whole                                    3 Large eggs
sea salt and cracked pepper                           6 Large egg yolks
1 cup ricotta cheese                                      1 tblpsn extra virgin olive oil
1/4 cup shaved parmesan cheese                    pinch of salt
1 tspn maple syrup

Method:
Filling:  Trim, deseed and cut the pumpkin into large chunky pieces.   Roll the pumpkin pieces in a bowl with olive oil and salt and pepper. Roast the pumpkin on a baking tray in a hot oven for approx 30-40mins.  Take a head of garlic, slice the top end off and drizzle with a little olive oil, season with salt and pepper and wrap it in foil.  Roast it alongside the pumpkin.   Once roasted, mash the pumpkin and combine with the other filling ingredients until smooth.

Pasta:
  • I mixed the pasta on the bench, for effect mostly, but by all means use a stand mixer with the hook attachment to get the ingredients combined to a certain point.  You will need to knead it by hand as well but it does save a lot of the mess.
  • Mixing dough: stand mixer
    • Add your flour to the bowl of the electric stand mixer, with the dough hook attachment. Take out about half a cup of flour, you can always add it in down the track but depending on the size of your eggs, sometimes a little too much flour will cause it to become too dry and hard.  Add eggs, olive oil and salt and mix until fully combined.
  • By hand:
    • If you are doing this on the bench, then add your eggs to a centre well and begin to mix using a fork to bring it all together slowly.  

  • Kneading:
    • Take the dough from the mixer and turn it out onto a lightly floured benchtop.  Knead the dough until smooth and you can form a soft ball.  Wrap it in gladwrap and let it rest in the refridgerator for about 2-3hrs if possible.
  • Rolling Pasta:
    • Take the dough from the fridge and cut it into about 6 even pieces. 
    • Press out one piece at a time into a flat disk.  Using a stand alone pasta roller or the pasta roller attachment on your stand mixer, feed the disk through the thickest setting.  Fold over and run it through again, about 3 or 4 times.
    • Change the dial down to a thinner setting and run the dough through some more.  Fold and repeat a few times on each setting.  Continue to change the dial down until you reach about setting 3 or your desired thickness.
  • Shaping pasta or filling
    • Once you get to this point you can use the other settings on your pasta attachment to make plain fettuccine or spaghetti pasta or in our case, we want long flat lengths to fill with butternut squash.
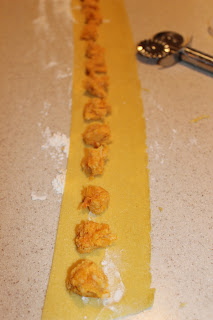
    • Cut manageable lengths of pasta, trim the edges and drop teaspoon size amounts of the filling evenly spaced along one edge of the length of pasta.  
    • Fold over the top edge and press down in between each teaspoon fillings.  
    • Using a knife or pasta cutter, cut between the ravioli to make the individual pieces.  Place on a lined baking tray ready for cooking.


The butternut squash and ricotta filling


To cook:

  • Place the pasta in a pot of boiling salted water and cook until al dente.
  • In a skillet, heat a good amount of butter until browned and toss cooked pasta through it.  Rip up some fresh sage leaves and roasted pine nuts.
  • Serve with extra parmesan cheese.
  • We really enjoyed the simplicity of flavors of this dish.  I served it with a fresh baby spinach leaf salad with blue cheese and walnuts which complimented this beautifully. 


Saturday, October 13, 2012

Game Day Beef Au Jus Sandwiches

It's a rainy Saturday and it's game day.  I felt like a cooked lunch today and overheard a version of this the other day.  It's a very simple dish, essentially adding a few tins together and cooking slowly over 4-6hrs.  I put this on about 8:30am this morning and had it well and truly ready for mid game lunch today. Exactly what I felt liked and it turned out really nicely.  A good dish when you have people coming through at different times, you can keep it warm in your slow cooker and serve whenever you're ready.


Serves 6

Ingredients:
1.8 lb Beef stew meat, cut into 5-6 large pieces
salt and cracked pepper
Extra Virgin Olive Oil
2 cloves garlic, crushed
1 tin Beef Broth
1 tin French Onion condensed soup
1 onion, sliced
1 bay leaf
1 tspn dijon mustard
1/2 cup red wine
1 tspn cornflour to thicken if necessary

Method:

  • Season your meat heavily with salt and cracked pepper
  • Heat a pan on the stove top and sear the beef in a little olive oil until well browned
  • Remove and place in a slow cooker.
  • Add a little more olive oil and cook the onion until tender and soft.  Add the garlic.  Then using some of the beef broth, deglaze the pan and get all the beef juices off the bottom of the pan
  • Tip it all into the slow cooker with the beef.
  • In the slow cooker, pour in the remainder of the beef broth, tin of french onion soup, mustard, bay leaf and red wine.  Ensure the beef is covered so add a little water if needed
  • Set the slow cooker to HIGH and cook for 3-4hrs.
  • Once that amount of time has past, remove the beef and shred with a fork and then place it back into the pot. 
  • If you need to thicken the sauce a little more, either cook with the lid off for a while or add a teaspoon of cornflour and stir it through.  I had my lid off for about 30-45mins and it worked out nicely.  
  • Serve in lightly toasted buns with some grated gruyere cheese and a beer!


Fish Fry Friday Taco

Nothing says Friday better than beer battered fish, so add shredded cabbage, a lime and chipotle dressing and some soft taco's... that's a friday I look forward to.  I have been meaning to post a good taco dish for months, intending of course to post on "Taco Tuesday" but I have killed two birds with one stone here and substituted a good fish fry as well.  Welcome to the weekend everyone!


Serves 4

For the Beer Batter:
1 cup all purpose flour
1/2 bottle of beer, 6oz (I used PBR because we are loyal WI fans but almost anything will do)

1 lb White fish, (cod fillets) thinly sliced
adobo or cajun seasoning
salt and pepper
lime juice
cornstarch for dusting fish

For the Dressing:
1/2 cup non fat greek yoghurt or sour cream
1- 1 1/2 tlbspn lime juice
1 tspn lemon juice
a little lime zest
1/2 tspn chili powder
1 tspn adobo seasoning
1 tblpsn chipotle chili sauce (adjust to your liking)
freshly chopped cilantro/coriander leaves
salt and pepper

Sides: cabbage coleslaw and cherry tomatoes with cilantro

Method:

  • To make the batter: whisk the beer through the flour until you achieve a smooth consistency.  Let sit in the refridgerator for at least 30mins
  • Cut the fish fillets into thin slices and place in a large dish, squeeze some lime juice over it, season with sea salt and cracked pepper and a teaspoon or so of adobo seasoning.  I used the light colored GOYA brand seasoning.
  • Heat the vegetable oil in a small deep fryer or saucepan to at least 375'F
  • Make your side dishes as you like, I made a quick cabbage coleslaw using mostly napa cabbage and a little red cabbage we had left from our garden.  
  • I halved some cherry tomatoes and let them marinate in some olive oil and cilantro, salt and pepper.
  • When you are ready to cook, dust the fish in a little cornstarch before dipping into the batter.  Do your fish in batches to ensure they have enough space to get beautifully brown and to ensure the oil doesn't cool down too much between each batch.  
  • You can keep your fish warm on a baking tray in a hot oven while you continue frying the rest of the fish.
Serve the fish in warmed tortilla's with cabbage slaw, tomatoes and drizzle generously the chipotle and lime dressing.

Thursday, October 11, 2012

Grilled vegie sandwich

I have some company during the days now... my sister-in-law is here staying with us for about a month and so I am really enjoying preparing something yummy for our lunches. I often used to eat late in the day or grab some fruit between errands so it's nice to sit down and eat with someone.  Cat is vegetarian so despite knowing she often cooks herself tomato pasta numerous nights in a row I feel I have to ensure she is full.  I probably over compensate and feed her entirely too many vegetables at every meal  time but she never complains. She thought today's lunch was 'blog worthy' so here it is.  


This week I went a little crazy with my food shopping and seemed to have bought every vegetable under the sun, all at once.  With time ticking away and still a fridge full of vegetables, now presenting with the early signs of giving up, I thought it was time to get roasting.  I like to do a big bunch of stuff at once and store them in containers in the fridge to use on salads or in grilled sandwiches. Although you might think this is a lot of work, it's really not and it makes your entire week so special and delicious.  Lots of big flavors in your mouth at once and better than you could buy out anywhere I assure you.  

Ingredients:
Butternut squash
Red bell peppers
2/3 cup mushrooms
Zucchini
Gruyere cheese (or haloumi is phenomenal)
A few sprigs of thyme
Dash of Balsamic glaze
Knob of butter
Hummus

Thick chunky bread

Method:
  • Preheat the oven to 400'F
  • Trim the skin of the squash and slice into 1/2 inch slices.  Place in bowl, drizzle a little extra virgin olive oil and sea salt and pepper over it and toss through.  Place butternut squash on a lined baking tray.
  • Slice the red peppers away from the seeds and into 3-4 large pieces per pepper.  Brush with a little EVOO and also place on the baking tray.
  • Put the vegetables in the hot oven and roast for between 20-30mins or until the squash is nicely roasted.    
  • Slice the zucchini lengthways and place on a hot grill pan.  Brush with a little oil, once they have seared a little.  You could also do eggplant the same way.  Sprinkle with a little salt and brush with oil and grill on a hot pan on both sides until charred. 
  • Slice a big handful of mushrooms and cook in a frying pan on the stove.  Using a little butter, sauté the mushrooms with salt and pepper and thyme until browned and then add a dash of balsamic glaze to the pan to flavour them ever so slightly.  Set aside.
  • Remove the red peppers from the oven after they have burnt a little on the edges (usually about 18-20mins) and place directly into a ziploc bag and seal it for 2-3 mins.  This will allow the skins to blister and make it easy for you to peel them.  Open the bag once they have steamed enough and remove the skins.  Roughly slice the peppers.
  • I like to use my sandwich press, so get that hot and lightly toast your bread with a very light brush of EVOO to each side.  
  • Spread some (store bought if necessary) hummus on one side of your bread and then layer all your other fillings on top.  Grill again briefly until the cheese melts and then remove and cut into portions.  
Of course there are lots of options when putting together a grilled vegie sandwich but this is a good way to make a solid lunch with some amazing seasonal vegies and a huge amount of flavor.  Have fun with it and get roasting, there's still time before the weekend!

Wednesday, October 10, 2012

Onion jam with Bangers and Mash

This week is all about comfort food for me.  After traveling for 2 weeks and eating in restaurants more than I ever could enjoy, I couldn't wait to get home and back in the kitchen.  Some of my favorite meals are the simplest... hence, why it brings to me Bangers and Mash.  

A lovely way to tart up even the most basic of combinations - the sausage and potato - is to add a sticky, sweet and golden brown carmelised onion jam.  You could add this to so many things to make them more beautiful.... grilled panini's, bruschetta with goats cheese and roasted red peppers, as a side to roast beef or perhaps use it for a simple pizza with spinach, grilled lamb and feta.  Options are endless, I just know you need to make it and then use it often!


To make the bangers; I have taken to roasting my sausages lately in a hot oven, saves the mess around the stove top and means I can get on and do other things while they're cooking away.  I add a little beef stock in the baking tray to help keep them moist and cook evenly.  I can then use the left over stock and sausage juices as a base for a lovely gravy and throw the sausages out in a pan on top of the stove to give them a little more color just prior to serving.  At the same time, simmer some diced potatoes in salted hot water while your sausages cook. Then mash or pass through a food mill with a good knob of butter, salt and cracked pepper and a dash of milk for the best consistency.

Caramelized Onion Jam

Makes about 1 1/2 - 2 cups

Ingredients:
Extra virgin olive oil
3 large brown onions, thinly sliced in long lengths
3 cloves, garlic crushed or mashed (I had some freshly roasted garlic)
1/2 cup apple juice or apple cider
2 sprigs of fresh thyme leaves
2 tblspn fig balsamic vinegar
1 tblspn apple cider vinegar
2-3 tblspn brown sugar

Method:
  • Place a good amount of olive oil in a large saucepan or skillet over medium to high heat. 
  • Cook the onions, stirring them occasionally until they are softened and golden brown, takes about 10-15mins.
  • Add the garlic, thyme, apple juice, sugar and vinegars and continue to stir until the onions go beautifully dark brown and the sauce becomes thick and jam like.  
  • Serve the bangers, mash and your choice of steamed vegetables with a huge helping of onion jam .

Tuesday, October 9, 2012

My Best Beef Stew

An oldie but a goodie as they say.  My parents made this when I was growing up and although I hated it then with all it's tomato skins and vegetables it is probably one of my go-to comfort foods now (less the tomato skins).  I make it slightly differently almost every time I think but the overall flavor is always the same - it feels healthy and hearty and so good for me that I can't help but love it.  I questioned tonight whether it was 'blog worthy' as I forgot to take a photo of the final plated meal but we all agreed, it's a fabulous family meal - a stock standard beef casserole but I can bet you this recipe wont ever fail you. My entire family love it and even my daughters' friends loved it so I figure it should get a mention and become a staple in your home too.    


Serves 6-8

Ingredients:
1 kg (2 lb) chuck steak
1 brown onion, finely diced
extra virgin olive oil
all purpose / plain flour
1 clove garlic, crushed
1 tspn dijon mustard
1 tin tomatoes (14oz), pureed
1/2 - 2/3 cup good red wine (don't be stingy)
500ml / 2 cups beef stock
2 bay leaves
1 tspn freshly chopped thyme
sea salt and cracked black pepper
1/2 cup diced carrots
1/2 cup diced celery
2 potatoes, diced
1/2 cup zucchini, diced
1 cup sliced portobello mushrooms
1 tblspn beef gravox / gravy mix

Optional - add parnsips, peas or any other favorite vegetable if you're game.

NB.  This is a 'slow-cooker' recipe.  Or a crock pot or pressure-cooker type dish.   I don't have the latter so my instructions are based around a slow cooker.  

Method:
  • Dice beef into large 1 inch cubes, place in a large bowl and coat in flour.
  • Heat a saucepan or frying pan and sear the beef in a little olive oil until browned.
  • Once browned, remove from pan and place straight into a slow cooker or crock pot.
  • De-glaze the pan with a little of the beef stock and par cook the onions, then carrots, celery, and finally add the crushed garlic.
  • Put these vegetables in the slow cooker with the beef, and add in the diced potato, mushrooms and zucchini.  Now add the red wine, the remainder of the beef stock, herbs, mustard and seasoning.  Give it all a good stir to mix it through.
  • Puree the tin of tomatoes with a hand mixer and add those to the pot also.
  • Allow to cook on low for 4-6 hrs.  
  • I usually add the gravox about 2 hrs before I plan to serve it.  I often remove the lid of the slow cooker for a period of 30mins to 1 hr at some point durning the cooking to assist with thickening the sauce.
  • Taste and adjust the seasoning if necessary.
  • The longer this cooks the better it is so it is a perfect dish to cook ahead of time, to freeze portions or to have cooking all day ready for you when you come in at the end of the evening.  
We like it served on plain pasta, elbows or spirals, but you could have it with a little rice or mash potato and some green beans as a side but how many vegetables do you really need to eat in one meal?!  


Cornish Pasty

The Cornish Pasty.  Wow.  What a great food.  Similar to our Aussie Meat Pie but more rustic and chunky, and made with a deliciously crunchy shortcrust pastry . The Cornish Pasty is regarded as the national dish of Cornwall, UK.  It came about when the miner's wives would make these for their husbands to take down the mines with them, (supposedly they were made to withstand a fall down a mine shaft)! They could be carried in their pockets, eaten cold or hot and contained a well rounded meal inside.  Traditionally they are made with diced beef, onion, swede (or turnip) and potato with a light seasoning. The use of carrots in Cornwall is very much frowned upon, but I don't know.... I can't knock back carrot when I'm using beef and vegetables.  Nowadays you could find them with almost anything inside them, from curried vegetables, chicken and vegetables and even a sweet version is being sold in parts of Cornwall and Devon. Since 2011, after a 9yr campaign by about 50 pastry makers in Cornwall, the term Cornish Pasty was awarded a Protected Geographical Indication.  However there still seems to be some controversy as to whether the crimping is supposed to be on top of the D shape or along the side.  I've seen it done both ways in Cornwall and for the sheer look of it, I like to crimp mine on top.  Make a pasty (or pastie) for yourself but just don't pretend you're making a Cornish one!  With that in mind, I made mine with some contraband ingredients so I will not claim the title in contents, only in form.  My girls ate them up beautifully so this a perfect family weekend lunch or mid week dinner. 


Serves 4

For the pastry
8 ounces all purpose flour
4 ounces cold butter, cut into cubes
6 tblspn iced water
Pinch of salt

For the filling: (make up your own)
  • 8 ounces of steak, cut into cubes (fillet steak)
  • 1 tblspn balsamic glaze
  • Splash of good red wine
  • Extra virgin olive oil
  • 1 potato, cubed
  • 1/3 cup diced parsnip
  • sea salt and pepper
  • freshly chopped rosemary
  • freshly chopped thyme
  • 1 egg for glazing, beaten
(I added 1/2 cup of diced carrots and 1/2 cup frozen peas as well)

Method:
  • Preheat the oven to 400'F 
  • In a mixing bowl place the flour and add the cold butter.  Using your fingers, rub the butter through the flour until it becomes grainy and coarse and the butter has been fully incorporated. Now add the salt and stir through.
  • Add the water and mix gently with your hand until a dough begins to form. Keep adding the water slowly until the dough comes together in a ball.
  • Wrap the dough in plastic wrap and let it rest in the fridge for 20-30mins
  • In a hot skillet sear the meat in the balsamic glaze and red wine.  Cook it briefly, 20-30 seconds then put it aside in a bowl.
  • Fry off the onions in a little olive oil in the same pan until softened and clear.
  • Combine the meat, onions, and other uncooked vegetables together in the bowl and mix until well combined
  • Take your pastry out of the fridge and divide into two.  Using a rolling pin, roll out 1/4inch thick sheet of pastry and cut out a 6" round disc.  You could use a side plate for this and cut around it. 
  • Take the scraps from making the first disc and re-roll to make your second.  Do the same with the other portion of pastry to make 4 in total
  • Add about 1 cup of mixture to the centre of each pastry disc.  Now add salt and pepper and as sprinkle of rosemary and thyme 
  • Run a little egg wash around the edge of the disc before bringing two of the sides up together and pinching the edges to secure the filling.
  • Place your pasties on a lined baking tray and brush the top of the pasties with the remainder of the egg wash before baking until golden brown.  
  • Serve with a good tomato chutney or baked beans and most definitely a glass of beer.

Saturday, October 6, 2012

Mushroom Bisque

Fall is here and there is nothing better than a beautiful homemade soup to warm you on these frosty and overcast days.  I adapted this recipe from one a friend was sharing which she really enjoyed.  I had made a delicious mushroom risotto in the past using a similar set of ingredients for the stock so I tried to stick closer to that when I was putting this together.  I did however puree all the good stuff this time rather than strain it all away like I would do for a risotto and the result was amazing.  A luscious soup with lots of guts and a subtle complexity which is not overpowering or too heavy.  I really enjoyed this and it took half the time of the risotto!  Definitely a keeper and cheap at that!  


Serves 6

Ingredients:

4 tblspn unsalted butter
2 leeks, while and light green parts only, sliced lengthwise and finely chopped
1 lb (500g) portobello mushrooms or mixed mushrooms, roughly chopped
2 tspn fresh thyme leaves
2 bay leaves
6 cups chicken stock or low-sodium broth
1/4 cup marsala or madeira
sea salt
cracked black pepper
1 cup heavy cream
3 tblspn freshly chopped parsley

Method:
  • Heat a large soup pot and melt the butter.  
  • Add the leeks and onion and saute over medium heat until tender, about 3 mins.  
  • Lower the heat, add the crushed garlic, salt and pepper, cover the pan and cook for 30mins, stirring occasionally.  
  • Add the mushrooms, stock, marsala, thyme and bay leaves and stir to combine. Cover and let simmer 20 mins longer.
  • Cool the soup slightly, then discard the bay leaves. I strained aside about 1 cup of the stock to ensure a thicker soup before pureeing with a stick blender or in batches in a large blender or food processor.  (If you wish to add this strained stock in later to thin it out you can, but I ended up keeping this aside for another use).
  • Freeze or store the soup at this point if necessary.
  • Return the pureed soup to the saucepan and add the cream when you are ready to serve.
  • Cook over low heat until the soup is warmed through, but do no allow the soup to boil
  • Taste and adjust the seasoning if necessary.
To serve, ladle into warmed bowls, garnish with parsley and serve immediately with toasted croutons.

I used batons of country french bread, buttered on both sides with a light shaving of Fontina cheese baked on a lined baking tray in a preheated oven at 350'F for 14 mins, turning halfway.  


Meatloaf

"Oh what'da call that love?" "...rissoles?".  Well, this rissole got a spruce up and rolled into a log and we here y'all call it meatloaf!  Tastes a treat and I am now a BIG meatloaf fan.  Still hate the band (sorry, can't win me over that easily) but this was delicious!!!  We ate it for lunch again the next day on thick toast with gravy and OMG, so scrummy.


Some may wonder why the recipes have been slow coming lately, some might be FB friends and now all about my every move.  Well for those of you who aren't, we took the family to Disney World in September for 5 days and then picked up an RV and drove back from Orlando to Milwaukee through the South.  Had an amazing time and although I didn't eat too many things on our journey I really wanted to write home about, I did try meatloaf at the Cracker Barrel in Indiana on the way home and it sparked some creative juices in me to help deliver this little number.  I was suitable impressed with the ease and simplicity of it for a family meal and will definitely be doing more along these lines in future.  You could obviously substitute ground turkey, chicken or pork for a lighter feel if you prefer and since I have my lovely sister-in-law staying with us who is vegetarian, I did a version of this using israeli cous cous and stuffed a red pepper (capsicum) for her in the same style.  I'll post that dish separately for you soon.  But for now, here it is - I don't think I'd change a thing.  The girls didn't totally get on board with this but they will, I put it down to first time nerves... although there is nothing scary about this, the flavors are mild yet interesting enough to leave us adults wanting more. Doesn't look like the prettiest thing on the menu but we can't deliver restaurant looking meals every night... don't want to spoil them too much!
Serve 4

Ingredients:
1 lb (500g beef + pork total)  I used 2/3 beef.
1/2 onion, finely diced
1 clove garlic, crushed
1 tblspn extra virgin olive oil
1/2 green pepper, finely diced
1/2 red pepper, finely diced
1/2 cup mushrooms, blitz in a mini-processor
3/4 zucchini, grated
1 cup puree carrots (or blitz in a mini-processor)
2 tblspn worcestershire sauce
1 fresh red chili pepper, finely diced (optional)
1 tspn of freshly chopped thyme
1/2 tspn fresh chopped rosemary, or dried if you need
2 tblspn freshly chopped parsley
salt and pepper
1 egg
2/3 cup breadcrumbs
1/2 cup milk

Topping:
1/3 cup V8 tomato and herb soup or V8 Original juice
2 tblspn brown sugar
1 tspn dry mustard powder

Method:
  • Pre heat oven to 350'F (180'C)
  • Finely dice your onion.  Heat a small pan on the stove, add olive oil and cook onion until tender.  Add chopped garlic, thyme and rosemary and continue cooking for a minute or two.
  • Remove from heat and allow to cool to room temperature.
  • Line a loaf tray with parchment paper and lightly spray with cooking spray
  • In a mini food processor, blitz the mushrooms, carrots (if not using puree) and peppers.
  • Grate the zucchini using a fine box grater for best results.
  • In a large bowl, mix the uncooked meat, all vegetables, including cooled onion, chili, parsley worcestershire sauce, salt and pepper and mix through well until all combined.
  • Add the egg, breadcrumbs and milk and mix again.  
  • It will look and feel quite moist but you want it this way to ensure it doesn't dry out while cooking.
  • Mold your mixture into the loaf tray and bake uncovered for 15mins in the preheated oven. 
  • Mix together all the ingredients in the tomato topping 
  • After the first 15mins, pour the tomato sauce topping mixture over the meatloaf and continue baking for another 45mins at 350'F. 
  • To finish cooking, at 1hr - turn the heat to 400'F and continue to bake for approx 10-15mins or until the internal temperature reaches 160'F or 70'C
To serve, slice thick slices and serve with mash potatoes, green beans or other steamed vegetables and a lovely rich gravy.