Sunday, May 29, 2016

Kalamata Olive Tapenade

Today while making a shared plate of cheese, grilled turkish bread and mixed dips I went back to this recipe. Olive tapenade.  It is so good on so many things.  I could go on forever with the ways I would eat this stuff but for now, I'll just say... make it and let it steer you in the right direction.  Today I ate it on toasted gourmet breads but tomorrow I will no doubt spread over a lamb rack before rolling it in a herb and proscuitto crust.  This is a Jamie Oliver recipe from one of his earliest books "Return of the Naked Chef" and I never change a thing.  


Ingredients:
250g or 90z kalamata olives, deseeded
1 clove garlic
6 anchovy fillets in oil
good extra virgin olive oil
sea salt and cracked pepper
juice of half a lemon 

Method:
  • Crush the olives using the side of the knife, pushing down to squash the olive against the seed allowing you to peel open the olive and remove the seed.  Do yourself a favor and buy the olives with seeds, and deseed them yourself.  Even with doing this job yourself, you can still have this tapenade made in less than 5 minutes.  These olives have such a different flavor to deseeded olives.  I wouldn't waste your time doing it with those, it'll taste so average you'll be disappointed you bothered. 
  • Using a mini processor, throw the halved olives into the processor, add all the other ingredients and process.  Add the oil gradually and continue to taste until it reaches your preferred consistency and flavor.  I used about half a lemon and probably about 3 tblpsn of oil but I like it quite thick.  Ensure you add a little salt, even though the olives themselves and anchovy are already salty, it adds something else to balance the lemon.  
  • Keep it in an air tight container for up to 10days in the fridge or make a double batch and use preserve jars and process for longer storage.


From left to right, whole olives; smashed olive;
halved with seed removed; the seed

Thursday, June 4, 2015

Green juice

Nothing is quite as cleansing in the morning as a green juice packed with ginger and lemon. I blend my ingredients rather than 'juice' them as I prefer to get the fibre in the fruits and vegetables, as well as the sugars.  It makes for a longer lasting fuller feeling and I get a good portion of my daily requirements in one smoothie. 

Personally I'm not keen on adding kale or spinach to every type of smoothie I make just for it's superpower. I really enjoy a green smoothie but otherwise I'm happy to have my fruit smoothies loaded with fresh and frozen fruits, coconut water, maybe some nuts or LSA or protein powder.  

However if you are going green, this is the bomb.  


Ingredients:
1/2 apple
1/2 lebanese cucumber
2 cups baby spinach leaves
1 inch fresh ginger, peeled
squeeze of 1/2 lemon
1/3 - 1/2 cup coconut water
crushed ice

Method:
In a blender, nutribullet or other high speed processor - blend all ingredients together.
Drink immediately!


Monday, June 1, 2015

Sweet and Salty Sriarcha spiced cashews

I'm always looking for a tasty little snack about 3pm as I run to pick up the girls from school.  Something quick to throw in my handbag when I'm busy running errands and just need to get  through to the next meal.  These are delicious and moorish! They also make the perfect addition to a cheese platter when entertaining.  They will keep well in an airtight container but I have to say, they don't last too long with me.  
These spicy cashews are super easy and a heap cheaper than the small jars of gourmet nuts in the stores. If you don't like cashews, almonds work well too.  Give them a try ;)


Ingredients:
1 egg white
2 tblspn water
1/2 lb raw cashews
2-3 tblspn sriarcha sauce
2 tbslpsn brown sugar
coarse salt, as needed

Method:
  • Preheat your oven to 330'F
  • Whisk together the egg white and water until frothy.
  • Toss the cashews in the mixture and allow to soak for a minute or two.
  • Drain the excess fluid from the nuts then add your sriarcha, brown sugar and stir until completely coated.
  • Prepare a baking tray with parchment paper, spread the nuts out in a single layer and sprinkle with salt.
  • Bake at 330'F for 5-6mins, or until lightly roasted. Toss and turn the nuts over on the tray and roast a further 3-4 mins.
  • Allow to cool and then nuts will then cool crunchy.
  • Store in an airtight container.  Munch away cautiously, they're addictive!


Wednesday, November 12, 2014

Pad Thai Chicken Noodle

I never thought to use linguine instead of rice noodles in an asian dish before but this works really well.  I used it initially because I had everything else in my pantry and didn't want to go to the store just for pad thai rice noodles when this could work just as well.  The pasta gives it a slightly heavier feeling but when you use cabbage and a lot of veggies you can really limit the amount of pasta you need.  Of course you could use gluten free pasta if you wish but then you may as well find rice noodles!  Spaghetti squash for those really 'off' pasta. 


I have done this a few different ways in the past, using the slow cooker to cook the chicken while I've been at after school activities with the girls or quickly poaching it in chicken stock for 10-12mins and then shredding it.  Either way works just fine but the point is, poach it in liquid for a moist, soft texture then shred to chunky bite size pieces ready to toss into the dish when you're ready to eat.  You can have the chicken and the sauce all prepared earlier in the day ready to quickly pull it together in the evening.

The girls didn't think they'd like this but after a few mouthfuls, they realized there weren't any real surprises and it went down well.  You can always substitute the vegetables you think you're children would prefer, grated zucchini is always a good one to sneak in as it is almost undetectable in a dish like this.  

Ingredients:

poached chicken:
3 chicken breasts, (cut into 3 pieces per breast)
1/2 can coconut milk
2 tblspn peanut butter
2 tblpsn soy sauce
1 teaspoon sriarcha
200ml chicken stock

peanut oil
3 spring onions
2/3 cup of grated carrot
1/4 green cabbage, finely sliced
1/2 red pepper, diced
1/4 cup cilantro, finely chopped
linguine
1/4 cup toasted peanuts, crushed as garnish

pad thai sauce
2 tblpsn peanut butter
1/2 can coconut milk
1/2 cup chicken stock
tamarind paste, 1 tspn
1 tblpsn fish sauce
1 clove garlic, minced

Method:
  • place the 'poached chicken' ingredients in a slow cooker and cook on high for 2-3 hrs until you can  shred the chicken using two forks (or poach the chicken in a saucepan in chicken stock and reduced amount of other ingredients)
  • start cooking pasta in salted water
  • add oil to pan and heat
  • add spring onions and sauté briefly before adding the cabbage
  • pour a few splashes of chicken stock to help wilt the cabbage
  • add the red pepper and carrot and continue to sauté 
  • add the shredded chicken and warm through
  • combine all the sauce ingredients together, heat it in a saucepan (or microwave jar) for a few minutes to ensure the peanut butter incorporates into the liquid.
  • once the pasta is cooked to al dente, drain and add to the pan and then pour in the sauce
  • stir through until the noodles and chicken are tossed well and coated in the sauce
  • serve with a garnish of cilantro and crushed peanuts, add extra sriarcha if you like a little more spice.

Monday, November 10, 2014

Silky gingered zucchini soup

Not sure this is a true blog 'come-back' but I just had to share this recipe.  I found it via a Whole30 recipe search.  A friend of mine is doing the 30day challenge and I was looking at some recipes to see how it really works.  Cutting out dairy, wheat, grains, all sugar, legumes, processed foods and meat, alcohol etc etc sounded like a tough 30 days!  I'm not keen to eliminate food types so drastically but I am always keen for some fresh ideas and a new take on the same old thing.

I was interested in this recipe because the author http://theclothesmakethegirl.com/2012/11/05/silky-gingered-zucchini-soup/ suggested it as a good breakfast alternative?!  Soup for breakfast... I could be up for that.  I don't like eating a lot of eggs, I am bored with porridge and greek yoghurt is hard for me to eat on such cold winter mornings.  


With my husband away until the weekend I figured I could eat this all week if it was any good.   I made it today and I have to say it is one of the most delicious soups I've ever had.  The ginger is divine and after you puree it all together, it transforms into an amazingly silky, creamy but light soup.  The zucchini is so mild  it makes for a wonderful base to take on the fresh ginger.  I LOVED it!  Not sure how I'll feel about eating tomorrow it morning but I think it's really going to be a winner.  Like a warm green juice.  Do it, you won't be sorry.

Ingredients:
1 tblspn coconut oil
1/2 onion, diced
salt
pepper
1 tspn minced ginger
3 cups organic or homemade chicken broth
3 medium zucchinis, halved and diced

Method:
  • Heat coconut oil in a soup pan
  • Add diced onion
  • Add salt, pepper and ginger
  • Add chopped zucchini and chicken broth
  • Bring to boil and reduce to simmer
  • Simmer for 30-45mins until zucchini are so soft and the stock has reduced a little
  • Using an immersion blender (or transfer to blender) and puree the soup in batches until you reach a creamy consistency.

Serve hot or store in glass jars in the refrigerator and enjoy!


Friday, June 27, 2014

Party Pies

My memory of childhood was a that a party was never a party without Party Pies.  Sausage rolls and party pies went side by side, and were a staple at all under age events in Australia!  I love their cute, dainty little size and the perfect balance of crunchy top pastry and slightly under-done base.  I remember always, ALWAYS biting into them too quickly and burning my tongue on the hot beef inside despite the number of times the cook would say ' now kids, they are just out of the oven, let them cool down a bit first'.  I loved them dipped in tomato sauce and eaten as quickly as possible, trying to get my share before the adults noticed they were available and the Dads ate their unannounced portion.

My girls are now nearly 7 and 8 and I fear that since living in the US since they were 3 and 4, perhaps their understanding of Party Pies and their place in the world of childhood parties is not so entrenched.  I decided to make them this week.  Not for any birthday party or event, just because.

I declared it a 'no-veggie night' and off I went....


Ingredients:
500g / 1 lbs chuck beef, ground
1 sml onion, finely diced
1 clove garlic, minced
3 tblspn worchestershire sauce
2 cups beef stock
2 tblspn cornflour
fresh thyme, finely diced
3 tblpsn tomato paste
1/2 cup carrot puree
salt and pepper
Shortcrust pastry
Puff pastry
1 egg, beaten.


Method:
  • In a medium hot skillet, sauté onions until clear, then add carrot, garlic and herbs
  • Add your meat, season with salt and pepper and cook well, until browned
  • Add the worchestershire sauce and cook until absorbed
  • Now add the tomato paste and mix through. 
  • In a bowl, whisk together your cornflour and beef stock before pouring over the meat.
  • Bring to boil and then reduce to simmer.  Allow it to simmer for about 30minutes (or more).
  • Taste and adjust seasoning if necessary.
  • Allow the meat mixture to cool well before trying to compile the pies.
  • While waiting for the mixture to cool, prepare your shortcrust pastry and then leave to rest in the refrigerator for at least 45mins before rolling out.
    • The recipe I love the most for Shortcrust Pastry and which works every time is Gordon Ramsey's. It is SO easy, seriously there is no excuse for store bought shortcrust if you have a food processor - it literally takes less than 3 mins. Find it here at http://whatsfordinner-mum.blogspot.com/2013/04/chunky-beef-mushroom-pie.html but essentially it is 2 parts AP flour :1 part butter :1 part iced cold water.
To put together the party pies:
  1. Bring out your puff pastry from the freezer to thaw. (I don't know how to make puff pastry and store bought is SUPER easy to buy!!)
  2. Preheat your oven to 375'f or about 190'C
  3. Prepare your muffin trays by lightly spraying with cooking spray.  I like to use a regular size muffin tray for party pies, you could use the larger Mexican size if you were making these for adults or some other large ramekin.
  4. Roll out your shortcrust pastry, to about 3mm thick.
  5. Using a cookie cutter or other round shape, cut out your shortcrust pastry bases to fit the bottom and sides of your muffin tray.
  6. Spoon in the cooled meat mixture until almost level with the top.


7. Cut out your top pastry using the puff pastry sheets.  I used a scalloped edge cookie cutter which   
    looks nicer when cooked.  Lay it top of your meat and press lightly against the base.  I didn't use 
   egg wash or anything to helps seal, just a little pressure and it stayed pretty well stuck.
8. Continue until all the mixture is used.  If you wanted to keep them for another time.  Flash freeze 
   them in the muffin tray at this point and then when frozen enough to remove from the tray, bag and 
   label them in freezer bags.  
9. If cooking straight away, then brush the tops of the puff pastry with egg before baking for about 
   22-25mins.


Thursday, June 19, 2014

Orzo pasta salad

During the summer I like to have some vegetables roasted at the beginning of the week to make my salads more chunky as well as healthy.  I don't always have protein for lunch so some roasted squash or red pepper or eggplant goes a long way for me.  Here is a summer dish I just love.  You could use pearl cous cous or orzo or quinoa, whatever you fancy.  The girls love that the orzo is small and cooking it in chicken stock gives it, it's own flavor.  You can substitute any vegetable or salad ingredient you like but here is a good balance of colors and textures to make a yummy lunch or light dinner.   Obviously if you don't have vegetables roasted already, then you would need to get the oven on and get those done first.  I have them in containers in the fridge so I just warm them through under the broiler or just mix them in with the hot pasta and thats enough for me.   I love to add chili flakes on mine as well for an extra kick.  


Ingredients:
orzo pasta
chicken stock
2/3 cup halved cherry tomatoes
1 cup broccoli florets, small 
2 tblspn basil, freshly chopped
1 clove garlic
knob butter
sea salt
cracked pepper
2/3 cup diced mushrooms
1/3 cup shaved parmesan cheese
grilled eggplant, diced
or butternut squash, roasted
optional: Grilled chicken breast slices

Method:

  • Cook pasta in boiling water with chicken stock
  • Soak florets of boccoli in boiling water for 5-8mins (while the pasta is cooking)
  • Dice mushrooms, heat a shallow skillet pan and cook mushrooms in a knob of butter. Add garlic, salt and pepper and cook until mushrooms release water and brown up.
  • Dice other ingredients, and place in a large bowl. Season with sea salt and cracked pepper, a drop of olive oil, chili flakes (optional) and add cooked garlic mushrooms.  Toss well.
  • When the pasta is cooked, drain well - retaining 1/3 cup of pasta water in a separate bowl.
  • Mix through a 1/3 cup of parmesan cheese while hot and then add to mixed vegetables.


Monday, June 16, 2014

Drunken Short Spare Ribs

These short ribs are really easy to pull together and using the slow cooker makes for a simple cooking method allowing loads of time to infuse the deep flavors.  It is not too strong and definitely not spicy so the whole family devoured these.  My girls loved them so much I started to think they may have noticed the wine!


I have done this with both short ribs with bone in and also boneless spare ribs... they were both amazing however if you tie the bones up before you start you will have a nice presentation when serving.

I made a roasted garlic mash potato to have with it, which in my opinion is the only way to go. It would be something I'd be happy to serve at a dinner party and using the slow cooker means it would be ready whenever you were.

I found this recipe at www.eatliverun.com/recipes and I didn't change a thing.  I used whatever nice red wine I had in the house, but don't go cheap.  Use a quality red that you would enjoy now.

Serves 3-4
Active time: 25mins
Totally time: 6-7hrs

Ingredients:
3 1/2 lbs beef chuck short ribs
2 whole shallots, minced
3 stalks celery, diced
2 tbspn vegetable oil
2 1/2 cups Barefoot Cabernet Sauvignon
1 cup beef broth
3 tbspn brown sugar
2 tbspn tomato paste
1 1/2 tbspn all purpose flour
1 1/2 tspn salt
1 tspn pepper


Method:

  • Heat the oil in a skillet over high heat.  When hot, add the short ribs.  Sprinkle salt and pepper over the ribs in the pan and brown.  This takes about 3-4 mins each side, as you want them nice and caramelized.

  • After the ribs have browned, remove carefully and set them in the bottom of your slow cooker
  • Take the pan off the heat briefly to cool down and drain or wipe out any remaining fat.
  • Return to medium heat and add the minced shallots and diced celery.  Saute for about 5 mins until tender, then add the tomato paste.  Mix the paste into the vegetables and continue to sauté for another few minutes
  • Pour the wine and beef broth into the skillet and stir. Add the brown sugar, a teaspoon of salt and pepper and flour.  Stir well to get rid of any flour lumps.
  • Bring sauce to a bil and reduce to simmer for a few minutes.  Pour sauce right over the ribs in the slow cooker.  Sprinkle remaining salt and pepper on top and place the lid on.  
  • Cook on HIGH for 5-6hrs or on LOW for up to 12hours.
  • When done, the meat should literally be falling off the bone.


Wednesday, February 5, 2014

Beef & barley soup

Living in the mid-west this winter has been pretty tough.  The cold is really starting to get old for us now and we can't believe it's only just February.  I was speaking to a parent from school this morning and he put it well, he said when your kids aren't finding the snow fun anymore, then you really know we've had enough.  It's true.  No one can get outside, and more than that - we don't even want to be outdoors.  Our skin has dried up, our lips are chapped... we look like a hot mess to be frank!  So, here I am cooking away in my kitchen day after day with my heater up to about 70'F and this week I made soup.

This was a super easy and hearty beef and barley soup.  I used a bit of vegemite so those of you here in the US, unless you want to spend about $10 on a small jar of our National pride, then you should just leave it out.  The worcestershire sauce does a good job of boosting the flavor at the beginning and that's all the vegemite does.  It's a strong yeast extract which mirrors a dense beef stock.


We all enjoyed this soup, the girls loved the beef and my husband and I ate this for lunch for a few days. I could have probably used a stick blender and pureed some of the vegetables for the kids servings (leaving the meat whole) and they would have eaten more but it was a thick soup as is and I liked the chunkiness of the veg.  This was a good dish to transfer to the slow cooker as we all needed to eat at various times on this particular night so it stayed warm for every sitting.

Ingredients:
1 large knob of buttter
olive oil
1lb quality stewing beef/chuck steak, 1inch cubes
1 tablespoon vegemite
1 tablespoon worcestershire sauce
1 medium brown onion
2 carrots, peeled and chopped
3 celery sticks, trimmed and chopped
1 bay leaf
1 sprig of rosemary
1 tablespoon flour
sea salt
black pepper
2 litres of organic beef stock
150g pearl barley (not quick barley, the regular stuff)

Method:
  • In a large soup pot or saucepan, melt the butter and add a splash of olive oil
  • Season the beef with salt and pepper
  • Brown the meat on all sides
  • Stir in the vegemite and worcestershire sauce. Turn up heat and cook until all the juices, and it does release a lot of juice, has evaporated and the meat is dark and rich in color.
  • Add the onions, diced vegetables and herbs and place the lid on top and sweat over low heat until the veggies have softened, about 5 mins.
  • Stir in the flour and mix through well for another minute or so, now add the stock.
  • Bring to a boil and then turn it down to simmer.  
  • Add your barley and cook gently for approx 1-1.5hours or until the meat is tender.
  • Taste and season if necessary.  Remove the bay leaf and rosemary.
  • If you wish, serve with big chunks of oven warmed ciabatta or french bread.


Sunday, February 2, 2014

Back to school Lunch-boxes

It's back to school time in Australia so it got me thinking I should post what I make for my husband to take to work every day. Maybe once a week I'll buy a fresh bread roll and put some ham or cold meat in it but usually it's this... his 'snack box' he calls it.  My girls have hot lunch provided at school so I don't need to prepare their lunch, which I am pretty disappointed about to be honest.  Not that they would jump at the chance to eat this sort of combination - WAAAY to many vegetables for them!

This is often what I do for myself too if I am busy running errands all day and know I'll be out of the house.  I also sit watching my girls do gymnastics for 2 hours twice a week so this is the perfect time to eat a late lunch snack box!

sugar snap peas, baby carrots, homemade turkey meatballs with
chipotle sauce, hard boiled eggs


Other common options and combinations are:
hummus
meatballs and sauce
poached chicken pieces
falafels and tzatziki
hard boiled egg
sugar snap peas
olives
blocks of feta or favorite cheese
baby carrots
6 slices of aged cheddar cheese and rice crackers
dried fruit - sultanas, apricots, yoghurt covered raisins
guacamole
celery sticks (with or without peanut butter)
cucumber sticks
cous cous salad with mixed veg
sliced deli meats: salami, ham, turkey breast, roast beef

Friday, January 31, 2014

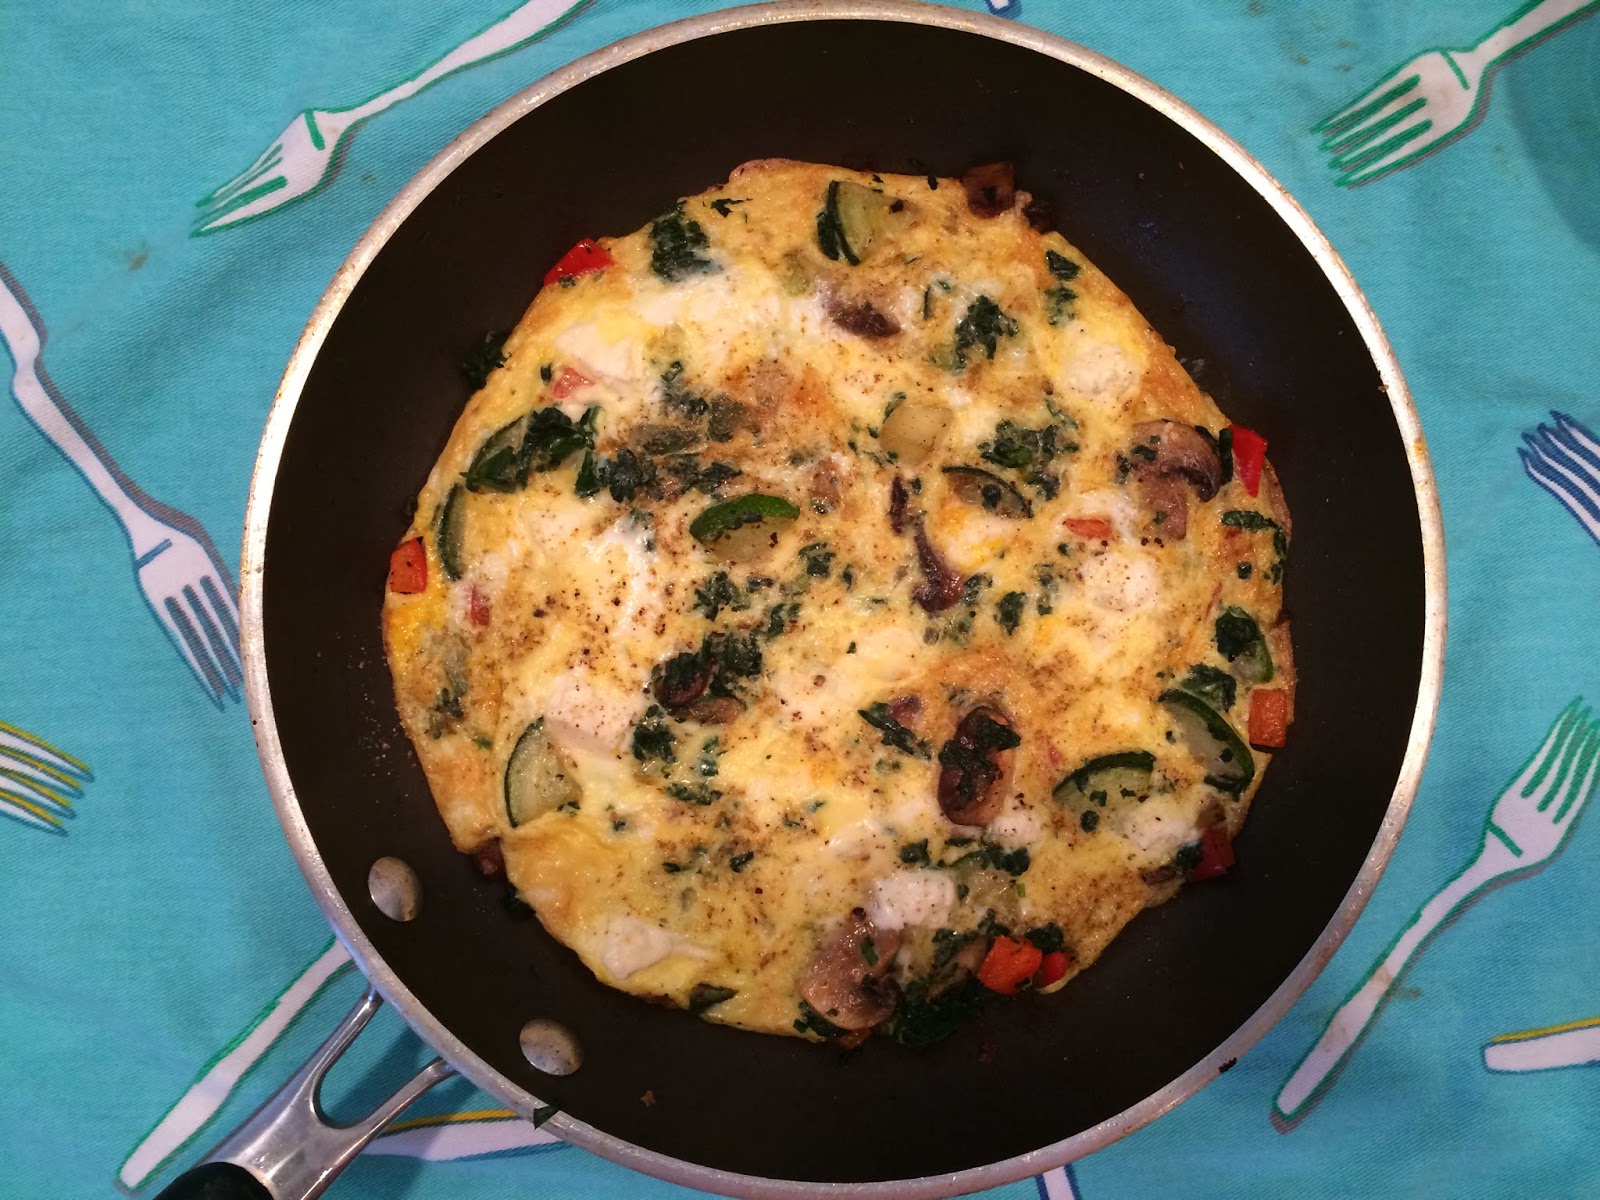
Breakfast frittata

Eat breakfast like a King they say... well this would do it.  I have started 2014 off with a high protein, low(er) carb diet as I am trying to build some muscle and strength.  A big healthy egg breakfast is the perfect way to refuel after an exhausting workout so here's one of my favorite ways to kick off my day. 

I have used a little cheese here, so even though I know it's not ideal I figure a little hard cheese in the morning is good with me if it's going to add something to a dish.  You could easily do without it but I don't want to :)


Ingredients:
1 egg (whole) + 1/4 -1/3 cup egg white, beaten
2 inches zucchini, diced in quarters
2 inches red pepper, diced
3 mushrooms, sliced
2 spring onions,finely diced
1 cup baby spinach leaves, wilted
cooking spray or a small tspn of butter
red chili flakes, fresh herbs like basil or oregano or a splash of tabasco (optional)
1 inch cube of non-fat feta crumbled (optional)
sea salt and cracked pepper

  • In a hot oven proof skillet, add your spinach and a drop of water and cook until wilted, push to the side of your pan. 
  • Add butter (or spray) and saute mushrooms with salt and pepper until browned and cooked through. Remove from pan while you cook your zucchini.
  • Turn on your broiler/grill to heat up
  • Add your zucchini and spring onions and cook until browned, then add peppers and any other veg of choice (cauliflower goes really well too!) and sauté for 1 minute.
  • Turn the heat down a little on your burner, return your spinach and mushrooms to the pan, distribute your ingredients evenly over the pan and sprinkle with fresh herbs or a dash of red chili flakes then add your beaten eggs.
  • If using, add your feta now and crumble sparingly over your egg.
  • Cook, undisturbed, on this side for approx 4minutes until the base has firmed up
  • Place the skillet under the broiler to cook the top of the frittata until the egg has set thoroughly, usually another 2-3minutes.
This is a big breakfast so if you wish to divide it in half,  you have breakfast ready for tomorrow!  
It re-heats and freezes well.  


Tuesday, December 10, 2013

Beef hamburgers

Hamburgers I think are something we should all be making fresh, from scratch with simple and tasty ingredients.  Once you have the essentials covered you can add whatever you like to a hamburger to suit your taste.  I have been grinding my own meat lately using my kitchenaid and I really love it.  I don't find it too time consuming or difficult and I much rather know what is going into making my patties.  I often find it so much cheaper and the extra 10-15min it takes to produce the most gorgeous looking ground beef is worth it to me.  The combination of using both chuck and sirlion makes for a delicious meat patty.  The chuck adds some much needed fat for big flavor and the sirlion keeps it lean.  I used it to make it with only chuck but these are better!

To cover off on the essential ingredients; you need to add salt, pepper, onion, egg and breadcrumbs to your ground meat.  That's a basic patty right... try this version which I've been making for a long time now. I use capers and a good dash of worcestershire sauce for a hint of flavor but otherwise it is the basic patty with some added dried oregano and shake of cayenne pepper.  I always sauté my onions first - there is nothing worse than biting into a piece uncooked onion in your burger.  I also use garlic.  To be honest there is not much I don't cook without garlic!  I have been topping it off with a homemade chipotle mayonnaise lately which just seals the deal for me in the hamburger steaks but I'll give you the cheats version if you don't want to make my original chipotle mayonnaise seen here http://whatsfordinner-mum.blogspot.com/2013/05/chipotle-mayonnaise.html.

Now, I have been holding off posting because I forgot to photograph the finished burger but we ate them again last night and STILL forgot to photograph! They are just too good not to share so I will update in due course but I figure everyone has seen a burger before!  Use your imagination!


makes 8 x 160g patties

Ingredients:
600g / 1.3lbs ground chuck
600g / 1.3 lbs ground sirloin
1 brown onion, finely diced, sautéed
1 tspn minced garlic
1 tblspn oregano
1/2 tspn cayenne pepper
3 tblspn capers, diced
2 tblpsn worcestershire sauce
salt
pepper
2 eggs
1/3 - 1/2 cup breadcrumbs

Method:
  • Dice your onion and saute in a hot pan with a drop of olive oil until golden and translucent.
  • Add the garlic and oregano and stir until fragrant
  • Remove and allow to cool completely (in the fridge if necessary)
  • In a large mixing bowl, to your ground meat add the rest of your ingredients and the now cooled onions and mix with a fork or hands until well combined
  • Divide mixture in half, then half again and again until you have 8 evenly portioned patties
  • Roll into solid balls, cover with glad wrap and refridgerate until ready to cook
  • Pre-heat your grill plate
  • Press in a burger press or with your hands to a flat'ish pattie and press a dimple in the inside so it doesn't swell
  • Brush patties with a little oil and grill for 3 minutes, then turn 90degrees, continue to grill for another 3 mins then flip.  Cook for 6 minutes on this side as well, turning 90'degrees to ensure the criss-cross pattern.
  • I usually add a slice of sharp cheddar cheese to the patty during the last few minutes of grilling to achieve a melted cheese top
  • When cooked, remove and leave to rest for 5-8mins before serving on a toasted bun with your favorite toppings and a good spread of chipotle mayo or ketchup.
  • Serving suggestions: sliced pickle, avocado, romaine lettuce and sharp cheddar cheese
Big burger balls ready for the fridge.  Press before grilling obviously!

cheats version of chipotle mayonnaise:
mayonnaise (store bought)
cholula sauce - to your liking


Wednesday, November 20, 2013

Baked Turkey Meatballs

I was in such a hurry tonight, I had every intention of putting these meatballs together during the day but just never got there.  Every other obstacle got in the way and so here I was at 5:45pm with some defrosted turkey meat looking at me, two hungry kids and it was all I could do not to pick up a beer!  I decided NOT to pick up the beer but instead, get cooking.  I would normally saute some onions and garlic and add that, cooled, to the meatballs but alas no time.  I ditched that idea and went straight for a quick and easy solution.... onion powder.  I used some fresh herbs which I even surprised myself at having this time of year and a dash of the secret ingredient.. worcestershire sauce.  I have to admit this dish did end up being incredible probably largely due to the fact that over summer when I was in the height of my summer produce from our garden and farm box deliveries I had made no less than about 2 dozen jars of homemade tomato pasta sauce which does contain the essential onions, garlic, basil, oregano and red wine vinegar.... so together this was a match made in heaven.  I'm sure you have a trusty pasta sauce either in your cupboard or if you were not running quite as late as I was, then putting it together really only takes about 10 minutes more so I would still call this a quick weeknight meal.


makes approx 18 meatballs.

Meatballs:
400g (just less than 1lb) ground turkey
1/2 tspn onion powder
salt and pepper
2 tblspn freshly chopped parsley
1 tblspn freshly chopped basil
2 tspn worcestershire sauce
1/4 cup parmesan cheese
1/4 cup breadcrumbs
1 egg


when ready to bake, add:
1 1/2 cups homemade pasta sauce
chunks of feta
shaved parmesan
basil leaves, ripped

Method:

  • Add all the ingredients of the meatballs in a large bowl and using a fork, mix well until fully combined. 
  • Roll into large tablespoon balls and place on a baking tray
  • Refridgerate for 15-30mins (or longer) if time permits 
  • Pre-heat your oven to 350'F
  • In a hot skillet, brown the meatballs in a drop of olive oil.  Toss and turn until browned all over but not necessarily cooked through. I turned the heat down and put the lid on my pan for about 3mins.
  • Place about 1 cup of homemade pasta sauce in the bottom of a pyrex dish, add your meatballs on top and then pour the remaining 1/2 cup of sauce over the top.  Rip up some fresh basil leaves and break off chunks of feta cheese, add a few shavings of parmesan and bake in your pre-heated oven for about 10mins.


  • Serve on a bed of rice or pasta if you wish, I had it with a simple side salad of mixed spring greens, kalamata olives, pine nuts, cucumber and parmesan.  I used a jalapeño olive oil with a tangerine balsamic.... just awesome. 


Homemade pasta sauce:  
loads of your favorite tomatoes, preferably roasted
onion, diced
garlic, crushed
fresh basil
fresh oregano
red wine vinegar
olive oil
sea salt and pepper


My method and exact quantities will be provided another time!  All I will say is, when tomatoes are in season, tasting their best and are at their cheapest - go to town and make it up in large batches so you always have some on hand.

Tuesday, November 19, 2013

Roasted butternut squash risotto with chicken

It's pumpkin harvest time again so time to enjoy some gorgeous roasted pumpkin (or squash) any which way you can!  I love risotto in the winter so these two ideas came together beautifully on a cold night.  I have been making macaroni and cheese with roasted squash for some time now so the girls are quite accustomed to the sweet flavor (and orange color) that I can pretty much misrepresent this new look as 'cheese sauce'.  The pureed squash gives it such a subtle sweet flavor that I think it would almost be impossible to have an issue with it.  In this risotto, with roasted garlic, wine and fresh thyme it was so delicate I was almost tempted to crumble some fresh blue cheese on top but it may have ruined the softness of this dish.  We all enjoyed this one so I hope you try it too.


Serves 4-6

Ingredients:
6 tblspn butter
1 brown onion, finely diced
1 zucchini, finely grated
3 cloves garlic, (roasted if you have time)
2 cups arborio rice
1/3 cup white wine
1.5 L chicken stock
1 roasted butternut squash, 2/3 of which are pureed
3/4 cup shaved parmesan
additional butter
2 chicken breasts, diced
5-6 sprigs of fresh thyme leaves

Method:
  • Cut the butternut squash into 2-3"pieces and place in a bowl.
  • Drizzle with olive oil, sea salt and pepper and fresh thyme
  • Roast a head of garlic at the same time.  Chop the tip of the garlic head off to expose the cloves, cradle it in a small piece of aluminum foil and drizzle olive, salt and pepper and thyme over it and cover in foil.
  • Place both the squash and the garlic on a roasting tray with parchment paper and bake for approx 25mins until the squash is cooked and lightly browned on the edges.
  • Puree the majority of the squash using a food mill, or press and allow to cool.  Retain about 6 small pieces per person which can be placed under the broiler just prior to serving as a crunchy garnish 
  • Set the garlic aside until you are ready to compile the risotto
For the Risotto:
  • In a large non-stick soup pot, add about half of the butter and a dash of olive oil and heat
  • Add your diced onions and cook until softened and translucent
  • Add your grated zucchini and allow to sweat until the water has evaporated out.
  • In a separate saucepan, begin to heat your stock 
  • Now squeeze out 3 roasted garlic cloves and add them to your onions, pressing them against the base of the pan until you get a paste.  Stir until fragrant and well combined
  • Tip in your rice and allow it to scorch in the hot pan.
  • Now add your wine and allow it absorb completely.
  • You can now add 2 ladle fulls of hot stock to your rice and stir regularly until it is completely absorbed.  Continue to add more stock, 2 ladles at a time until your stock is used and approx 20mins has passed. 
  • At the same time, in a small skillet, cook your chicken pieces in a hot pan until just cooked.
  • Add your chicken to your rice and the pureed squash.  If you need a little extra liquid, taste and decide whether you need more stock or just hot water. 
  • Your rice should now be cooked through. 
  • Turn on your broil/griller and heat your remaining pieces of squash to be used as a roasted garnish
  • Turn the heat off, add the parmesan cheese, the remaining 3 tblspn of butter and stir gently.
  • Adjust the seasoning if necessary and serve immediately with your additional roasted squash pieces, a shaving of parmesan and some freshly cracked pepper.


Tuesday, November 12, 2013

Sweet potato tots

Tater tots...  Not something I buy too often but wondered whether it would be worth making them for myself.  Verdict: they were so simple and really tasty.  I used some fried bacon for a bit of extra flavor but it would be equally as nice without it I think.  We had them with chicken parmesan and steamed vegetables so they weren't the highlight of the meal but for my salad lunch the next day, they certainly were the stand out! 

You could use regular white baking potatoes if you prefer regular tater tots but these were so sweet, they were almost like a butternut squash.  Once rolled, I kept them in the fridge until I was ready to fry them in the pan so they had a chance of holding their shape, they would certainly be a good thing to freeze and have ready when you wanted them.  I'd do them again for sure.  I did have the oven on as well so that I could fry them in small batches until golden and crispy and then finished them off in the oven for about 5mins.  I will try baking them from the start next time but I wanted to ensure these were crunchy as well as hot.


Ingredients:
2 sweet potatoes, boiled and grated
3 rashers bacon, sliced
3 tblpsn all purpose flour
salt and pepper

Method:
  • Boil the potatoes (with skins on) in hot water for about 10 -12mins until partially cooked then remove and run under cold water.
  • Dice the bacon and cook in a skillet pan until browned and crunchy, drain on paper towel.
  • Once cooled, dice the bacon further until you have small bacon bits.
  • Peel the skin of the sweet potatoes and then using a box grater, roughly grate them 
  • In a large bowl, mix the grated potato, flour, bacon and season
  • Take a tablespoon of the mixture in your palm and roll and squash into a rough ball, then shape into tater tot size logs. 
  • Leave on a tray and refridgerate (or freeze) until ready to pan fry or bake in the oven
  • Serve as a side dish to your main meal or with a simple honey mustard dressing for a game day snack.
Honey mustard sauce
4 tblspn mayonnaise
2 tspn honey
2 tspn dijon mustard


Monday, November 11, 2013

Slow Cooked pulled BBQ pork

Pork shoulder was on special last week so I got myself about a 4.5lb piece - not for any real purpose, other than thinking I would grind my own delicious pork mince for my next batch of spaghetti bolognese. However instead of grinding it, I decided to throw it in the slow cooker and see what would happen using my trusted pork spare rib rub recipe.  It was so easy it was almost unbelievable. My rub blend is probably a tad too hot for my girls so if you want to make this for your whole family I suggest you just switch the cayenne pepper out for some dried oregano but otherwise the flavors were awesome.

I had this in the slow cooker by 1pm and by 5pm I literally could break the pork using the back of a fork, it was completely shreddable and there was plenty of liquid to keep it moist.  Again, the beauty of the slow cooker is that it stays warm all evening long so on those nights when people are coming and going, you can be flexible.  


Ingredients:
4lb pork shoulder
Pork spare rib rub (see my previous post http://whatsfordinner-mum.blogspot.com/2012/07/best-baby-back-ribs.html)
1/3 cup BBQ sauce (homemade or store bought)

Method:
  • Cut pork shoulder into fist size pieces to ensure a greater surface area to coat the rub.  Massage  the rub onto each piece of pork
  • Pour about 3/4 of the BBQ sauce into the bottom of the slow cooker
  • Add the spice rubbed pork on top
  • Cook on high for 4-5hrs or until the pork can be pulled apart with a fork
  • Shred the meat and mix through the remaining sauce if needed.

Serve in a hamburger bun, taco or wrap with a simple coleslaw or avocado and sour cream


Sunday, November 10, 2013

Penne with chicken and spinach

This was a hit last night.  I was intending to make a carbonara but we didn't have any bacon or eggs and I had some leftover cooked spinach I wanted to use up.  My friend Mel gave me a new tip - peel a zucchini and finely grate it and add it in with the onions.  The girls never notice or taste it and I feel better about adding some extra vegetables to their meal.  I used cream today because I had no eggs but you could probably make a white sauce using butter and flour if you wanted to avoid the cream.  I wiped up some yummy garlic bread by defrosting a leftover bread roll from my freezer, made a quick garlic butter and had that in the oven while I prepared and cooked this, we were eating within 20 mins easily and we all had a relaxed and enjoyable mealtime.


Ingredients:
1 chicken breast, diced
1/2 brown onion, finely diced
1 clove garlic
1 zucchini, peeled and finely grated
1/2 cup cooked spinach, chopped
1 cup portobella mushrooms, sliced
knob of butter
olive oil
sea salt and pepper
1/3 cup cream
1/3 cup grated parmesan cheese
400g penne pasta

Method:
  • Boil pasta in salted water until al dente
  • Drain and rinse in cold water
  • Saute/steam spinach in a hot skillet with a lid on, in a drop of water until wilted. When cooked, drain and chop in a mini processor to a fine chop.
  • Saute onions, add garlic and then grated zucchini
  • Move to one side of the pan and add butter and mushrooms. Stir frequently and season well with salt and pepper. Saute until mushrooms are well browned.
  • Add chicken pieces and cook through.
  • Add cooked pasta, cooked spinach, cream and parmesan and stir until well combined and heated through
  • Taste and adjust seasoning.
  • Serve with garlic bread, a side salad and a sprinkle of additional parmesan cheese.  


Friday, September 20, 2013

Sugar Cookies


I have been busy baking cookies lately for various occasions for my girls at school.  Before moving to the States 2 years ago, I'd never baked a cookie in my life!  Just not a big thing in Australia so I was under some pressure to get up to speed, particularly if I wanted my little hobby with parties to succeed here in the US.  I quickly learned some basic techniques and now have been having more and more fun decorating sugar cookies for all sorts of occasions.  These are some from our Wedding Anniversary celebration a couple of weeks ago.  I really enjoyed putting together the event styling and preparing all the food for our event but I was particularly proud of these.  So simple but so cute. I have to credit the fact that I use an awesome sugar cookie recipe and more than that, I use an incredible vanilla extract which has transformed the taste!  


I use the recipe below from Glory from Glorious Treats and I love the flavor and texture.  Some cookie folk use icing sugar in their mixture but I'm not sure about that, might be something I try down the track but this gives a great texture to work with and so I am sticking to this for now.

Rolled Sugar Cookies, 

3 cups all purpose flour
1 teaspoon baking powder
1 cup (2 sticks) unsalted butter, room temperature
1 cup sugar
1 large egg
1teaspoon good quality vanilla extract

Directions:

Directions as per Glory, here at http://www.glorioustreats.com/2010/03/making-sugar-cookies-recipe-and-tips.html

I could rewrite her directions but she has done a wonderful job of working through each step with easy to follow photographs.  I also think it's necessary that you explore her site and get lost in her creativity... she's amazing.

Here are some more of mine for a baby shower Party Favor I finished today.... a little preppy, in some spunky colors of yellow, blue, lime green and grey.


Thursday, September 19, 2013

Dukkah

Dukkah (pronounced Dook-ah) is an Egyptian spice and nut mixed which is usually served with bread and oil as an appetizer.  I gave these as a party favor gift at our recent Anniversary Party so I hope there are now people all over Wisconsin enjoying some tasty dukkah with their friends! It is a simple yet interesting start to a meal or you could use it in place of a breadcrumb to coat lamb or pork before pan frying or baking it.  There are loads of ways to use this versatile mix.  If you're interested in trying something different, you will be so surprised with the flavours you can achieve my mixing the basic blend of nuts with any other of your favorite element to make something you just love.


1 cup hazelnuts
1/2 cup pistacchio nutes
1/2 cup sesame seeds
1/2 cup coriander seeds
1/4 cup cumin seeds
salt
pepper or peppercorns

Method:
  • In a hot dry skillet, roast the nuts and seeds separately until they are toasted and aromatic.
  • Process each element in a coffee grinder to a coarse grind.  Finer if you wish but it is nice to have a bit of texture to it to grab hold of the oil on the bread.
  • Mix the quantities you desire and add salt and pepper. 
  • Optional: Add red pepper flakes, dried lemon etc (whatever takes your fancy) until you are happy with the flavor.
  • Store in an airtight container in the pantry for up to 3months.
  • To eat; tear off pieces of a nice rustic bread, dip it in a good quality olive oil, and then dip into a bowl of dukkah.  Delightful!
additional options:
ras el hanout
fennel seeds
dried lemon zest
red chili flakes
dried herbs - mint, thyme


Wednesday, September 18, 2013

Stuffed Red Peppers

This was a knock out.  Very easily made into a vegetarian meal and sometimes I would say it would even be preferred but tonight we ate it with some spicy chorizo sausage meat and it was amazing.  My apologizes, it is not the most gorgeous of photographs, but let me tell you - you will inhale it! I had some left over cous cous from the night before and needed to clear out my vegetable drawer of some rather suspicious looking zucchini's.... I whipped this up and had it in the oven within minutes.  A beautiful aroma filled my house as it cooked and with a simple salad, it was a great healthy mid week meal.

Ingredients:
1 cup israeli cous cous, cooked
2 cups chicken stock
1/4 cup parmesan cheese
100g chorizo sausage meat
1/2 small red onion, diced
butter
1 tspn garlic
smoked paprika
oregano, dried
2/3 cup portabello mushrooms, finely diced
1/2 medium zucchini, finely diced
chili powder or red pepper flakes
1/2-1 cup tomato sauce / pureed tomatoes
tabasco sauce, optional

vegetarian option:
diced zucchini
roasted butternut squash
roasted eggplant

Method:
  • Carefully cut around and remove the stalk from the red pepper and then slice it in half.  Trim and clean up the seeds from the inside so that you have two tidy half shells.
  • Pre heat your oven to 350'F
  • In a saucepan, cook your cous cous in chicken stock and a pinch of salt, until tender.  When ready, add a knob of butter and 1/4 cup of parmesan cheese and mix through.
  • Heat a small skillet, add a drop of olive oil and cook your diced red onion under tender.
  • Add garlic and zucchinis and cook for about 3mins. Add the mushrooms and a knob of butter.  Season with salt and pepper, oregano and mix well.
  • When the mushrooms and zucchinis have browned nicely, remove from the heat and pour all the onion, mushroom and zucchini into a mixing bowl.
  • Cook your chorizo meat in the same skillet until browned.  Drain any excess fat.
  • Mix your chorizo with your vegetables and taste.  Add tabasco, chili powder or smoked paprika to your liking.  
  • Add 1/3 cup of tomato puree and mix well.
  • Spoon mixture into your half red pepper shells and bake for approx 25mins.
  • Baste with a little extra tomato sauce after 15mins of cooking to ensure it stays moist.
As everything is already cooked you are just waiting for the peppers to soften slightly and for the flavors to incorporate.  Serve with a fresh mixed leaf salad, corn on the cob or boiled potatoes.